
Integrating Mollie terminals
With Mollie, POS providers, SaaS platforms, and system integrators can build integrations that accept in-person payments using Mollie payment terminals connected to a point-of-sale (POS) system. Using Mollie’s APIs, they can initiate and manage these payments directly from their software.
Basic payment flow
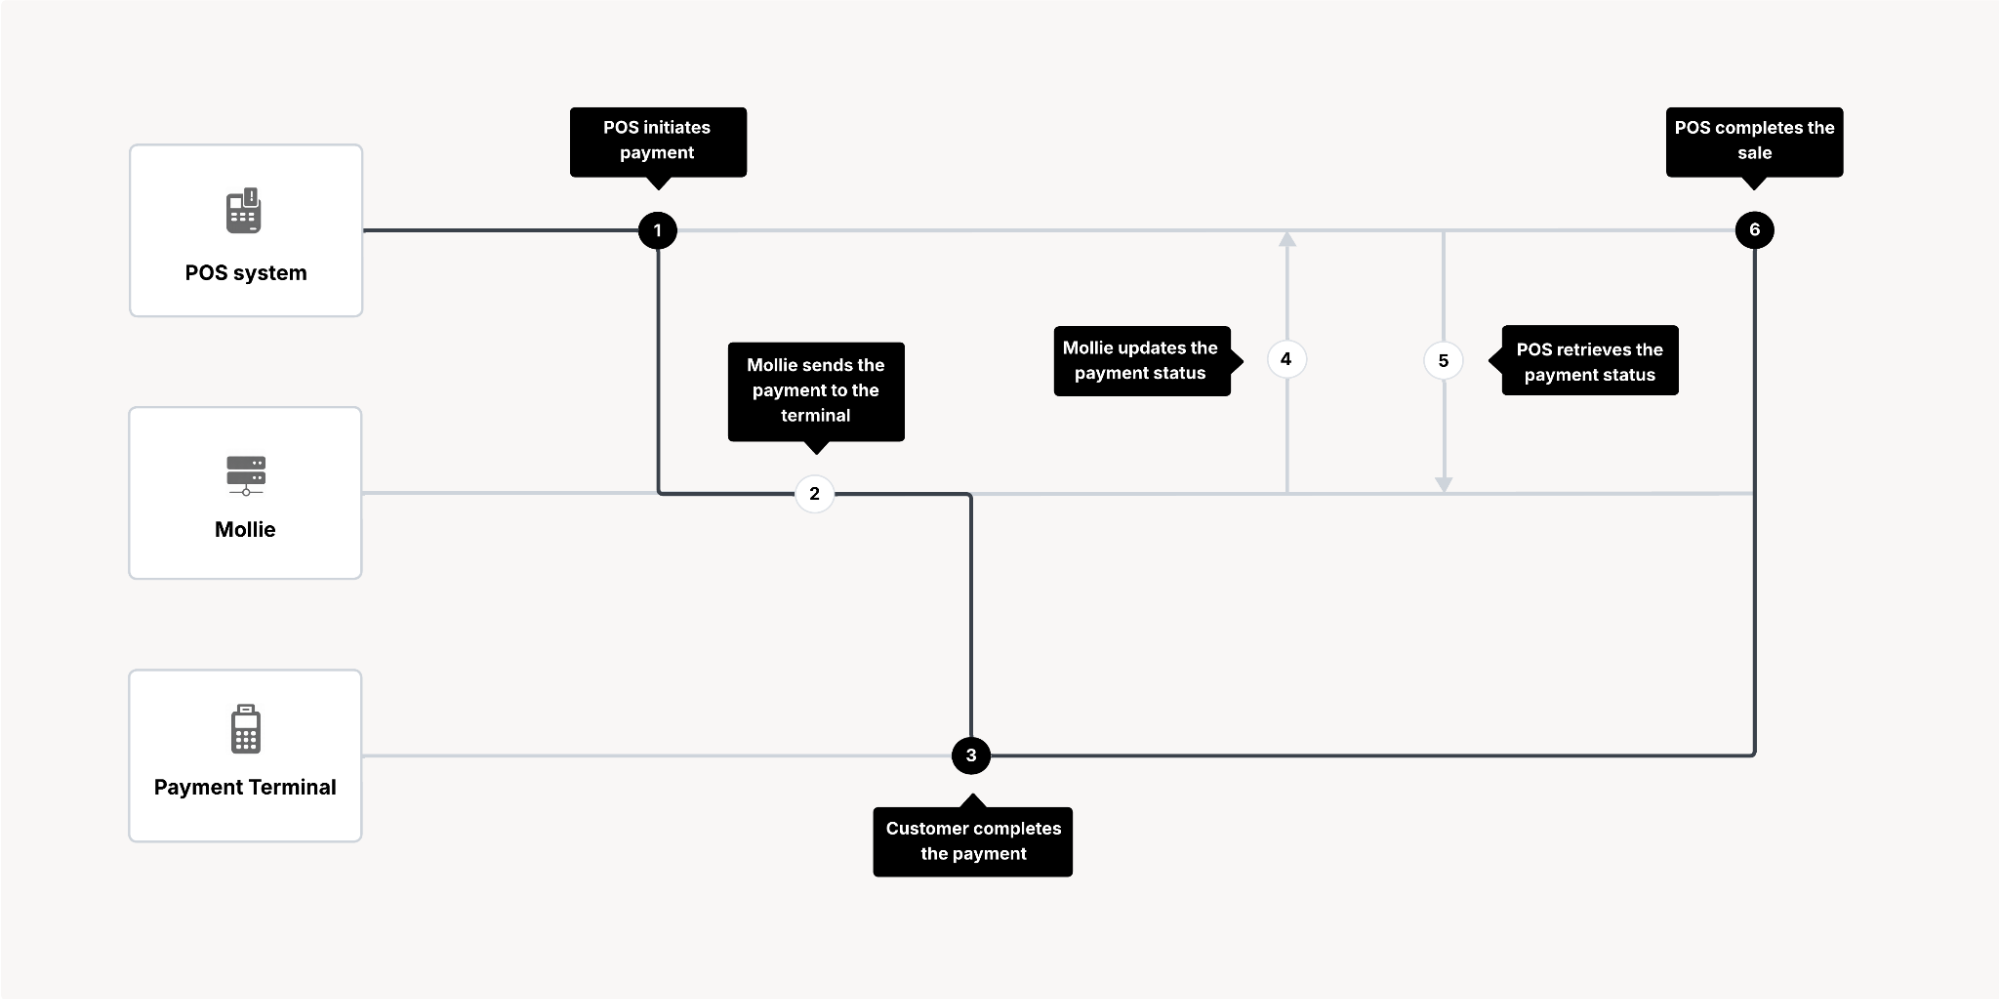
In its simplest form, in-person payments start in the POS system and are completed on a Mollie payment terminal:
- The POS system initiates the payment
- Mollie sends it to a specific terminal
- Your customer completes the payment
- POS system uses the payment status to determine whether to complete the sale
Working with Payments API
Terminal payments are created and managed using Payments API. Typically you can create, process, and complete an in-person payment this way:
- POS system creates a payment by sending a
POSTrequest to Create payment endpoint with paramsmethod=pointofsaleandterminalIdof the specific payment terminal - Mollie sends this payment request to the terminal
- Customer completes their payment in-person
- Mollie updates the corresponding payment status (and sends a webhook notification if configured)
- Your integration retrieves the payment status from Mollie (using the
paymentIDreturned when the payment was created) - Once the payment reaches its final state, the POS system determines whether to complete the sale
Terminal assignment
Before initiating payments, your integration must determine which payment terminal should process the transaction. Each terminal has a unique terminalId. This identifier is required when creating point-of-sale payments.
Your integration can retrieve the available terminals using Terminals API. Typically, POS systems associate terminals with a store location, checkout or device.
Each terminal belongs to a payment profile and you can use separate payment profiles to group terminals by store or location to make managing them easier and more intuitive.
Once the terminal has been selected, your integration uses the corresponding terminalId when creating the payment.
Example call:
curl -X GET https://api.mollie.com/v2/terminals \
 -H "Authorization: Bearer live_your_api_key"
Example response:
{
  "_embedded": {
    "terminals": [
      {
        "id": "term_xxxxxxxxxxxxx",
        "brand": "PAX",
        "model": "A920",
        "status": "active",
        "locationId": "loc_xxxxxxxxxxxxx"
      }
    ]
  }
}
Creating payment
To start an in-person payment, your integration must create a payment using Create payment endpoint. For point-of-sale payments, you must:
- set the method to
pointofsale - provide the
terminalIdof your selected payment terminal - include parameters that state the
amountand payment'sdescription
You can also include a webhookUrl so your integration can be notified when the payment status changes.
We recommend storing
payment IDreturned in the response so you can retrieve the payment status later.
Once the payment has been created, Mollie sends it to the terminal.
Your customer can then complete the transaction on the device. Your POS should wait for the payment outcome before completing the sale.
Example call:
curl -X POST https://api.mollie.com/v2/payments \
 -H "Authorization: Bearer live_your_api_key" \
 -d "amount[currency]=EUR" \
 -d "amount[value]=10.00" \
 -d "description=POS payment" \
 -d "webhookUrl=https://example.com/payments/webhook" \
 -d "method=pointofsale" \
 -d "terminalId=term_xxxxxxxxxxxxx"
Handling payment status
Typical flow
The typical flow after the transaction is completed goes like this:
- Mollie updates the payment status
- Mollie sends a webhook notification to your backend
- Your integration retrieves the payment status from Mollie (using a
GETrequest to Get payment endpoint) - The POS system determines the outcome of the payment
So after the customer completes the payment at the terminal, Mollie updates the payment statuswhich you can track using the payment ID returned when the payment was created.
If a webhookUrl is included in the payment request, Mollie sends a webhook notification when the payment status changes. When your webhook endpoint receives this notification you can retrieve the payment from Mollie to check its current status: send a GET request to Get payment endpoint.
Once the payment reaches a final state, such as paid, failed or canceled, the POS system can determine whether the sale should be completed or canceled.
Payments with the failed status include a statusReason in the response. This contains a code and a description which you can display in your software so the user can understand why the payment failed (and possibly retry the transaction).
See Status reasons for a full list of possible reasons.
Example request:
curl -X GET https://api.mollie.com/v2/payments/tr_xxxxxxxxxxxxx \
 -H "Authorization: Bearer live_your_api_key"
Example response:
{
  "id": "tr_xxxxxxxxxxxxx",
  "method": "pointofsale",
  "status": "paid",
  "amount": {
    "value": "10.00",
    "currency": "EUR"
  },
  "terminalId": "term_xxxxxxxxxxxxx",
  "cardDetails": {
    "cardHolder": "J. Doe",
    "cardLabel": "VISA",
    "cardNumber": "**** **** **** 1234"
  },
  "createdAt": "2024-01-01T12:00:00+00:00"
}
Completing a sale in POS
Once your integration retrieves the payment status from Mollie, the POS system can determine whether the sale should be completed.
- If the payment reaches a successful final state, the POS system can finalize the transaction and finish the regular checkout flow (such as printing a receipt or updating the order status etc).
- If the payment fails or is canceled, the POS system should not complete the sale and instead retry the payment or choose another payment method.
If the payment outcome is not known yet, the POS system should keep the sale pending and retrieve the payment status again using the stored payment ID.
Do not complete the sale until Mollie reports a final payment state. Your integration should always verify the final payment status before completing the sale.
Updated 26 days ago