Integrating Tap to Pay in Your Android App
With Mollie’s Tap App, Tap to Pay functionality can be seamlessly integrated into your Android application. The integration enables processing contactless card transactions by invoking Mollie Tap via Android app-to-app intents, ensuring secure communication during payment processing.
The integration consists of the following steps that we will cover in detail in this article:
- Register your app with Mollie to receive security credentials
- Install and pair Mollie Tap
- Implement message signing for secure communication
- Initiate payments from your Android app
- Handle payment responses and webhooks
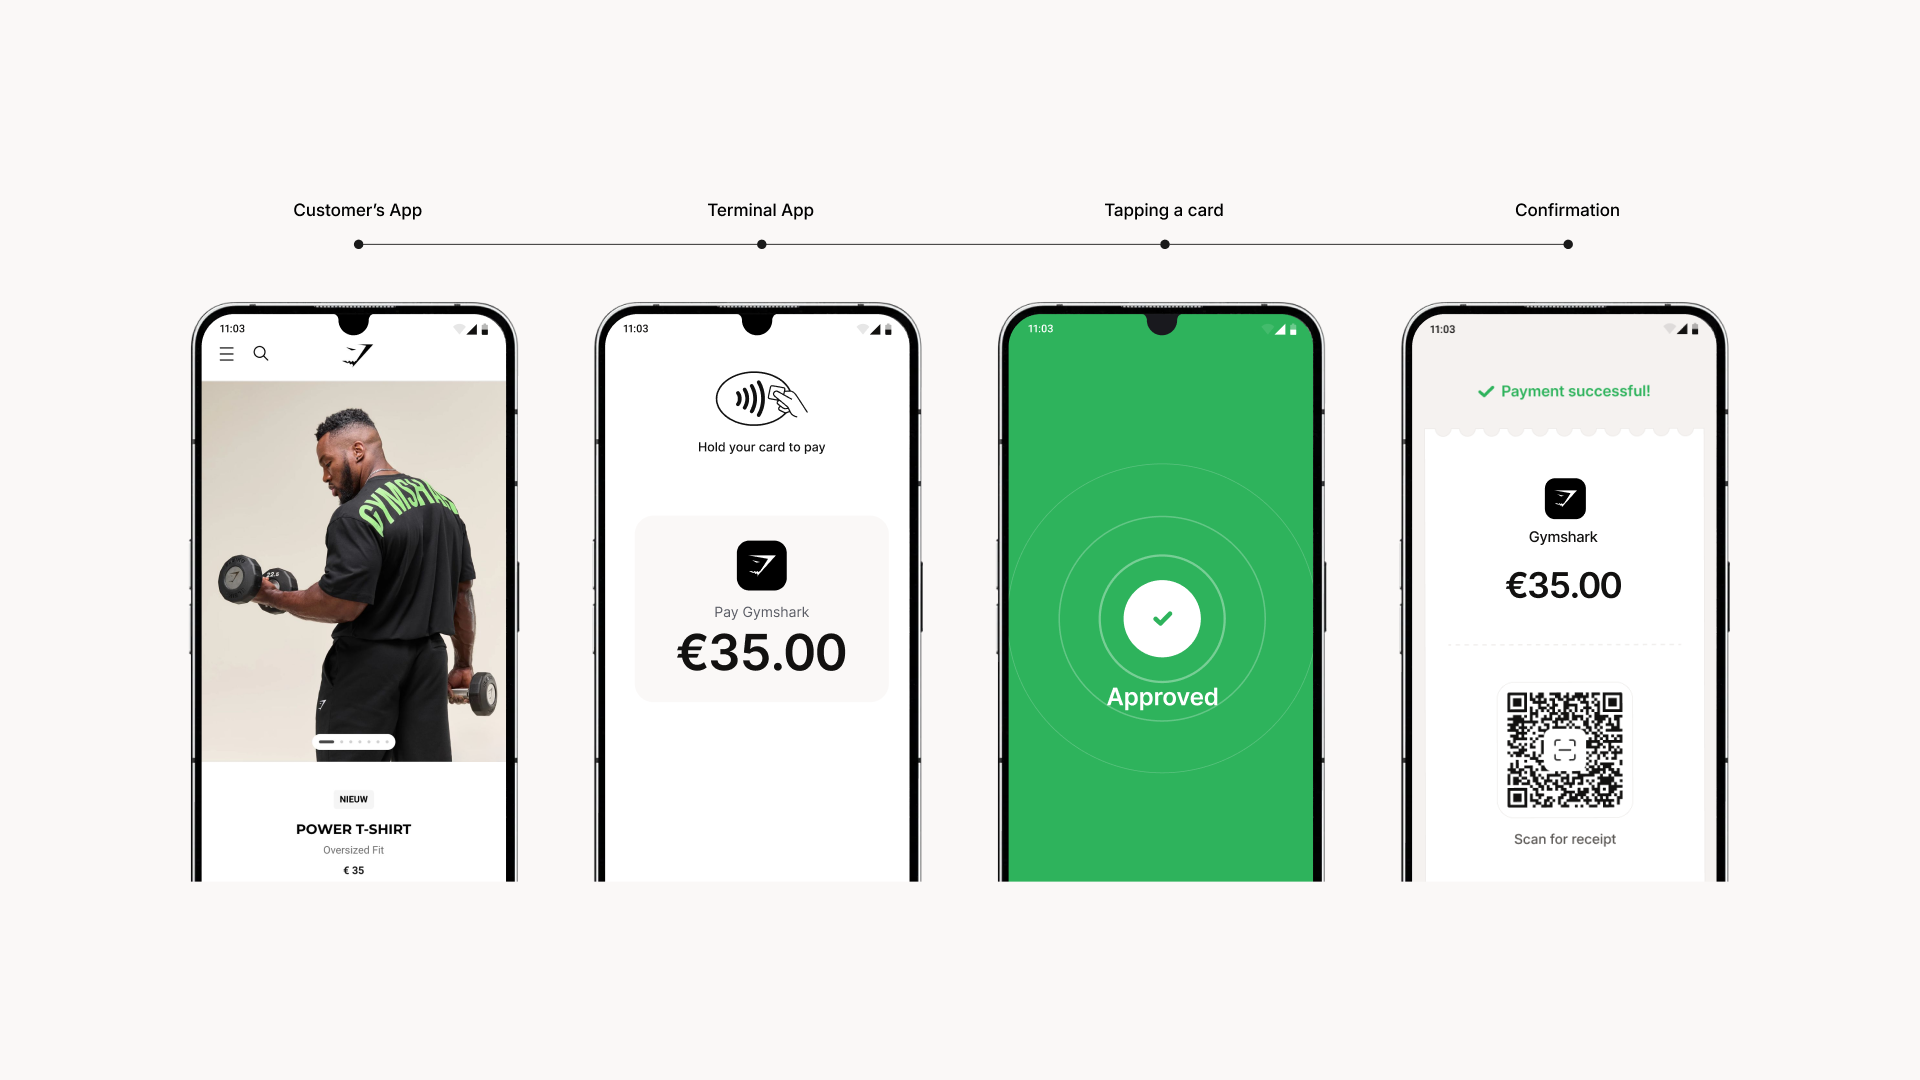
Basic payment flow
Basic Tap to Pay flow follows these essential steps:
- A customer decides to buy something on your website
- You initiate a transaction in the Tap App
- Your customer taps a card to finalize a contactless payment
- A Confirmation page is shown in your App
What you need to do in advance
Before you start, you need to:
- Have an Android application with a registered
bundle ID - Have an active Mollie account (merchant or partner account)
Setting up Tap to Pay in your App
Step 1: Register your Android App with Mollie
To begin integration, you need to register your Android App with Mollie:
- Submit your Android App
bundle ID(e.g.,com.example.myapp) to our Support team. - You will receive:
- A
secret key(secure key for message signing) - A
secret ID(prefixed withpossecr_)
- A
These credentials enable secure communication between your App and Mollie Tap.
Step 2: Install and pair Mollie Tap
Activating Mollie Tap is done in a few simple steps. All you need is Mollie Tap (download it here) and a QR code that you can retrieve from Mollie Web App.
Activating Mollie Tap
- In Mollie Tap, click Start setup
- Scan the QR code in your dashboard with the Tap App, or type in the set-up code
- Allow the required permissions
- Click Next; your device will complete the setup
After successful pairing, the device appears as a terminal in your Mollie Dashboard.
Retrieving a QR code
- In your Mollie Web App, navigate to Point-of-Sale
- Click Add Terminal at the top right corner, then select Activate Tap
- Choose the profile you want to process payments with along with features you want to enable and click Continue
- A QR code will be displayed on your screen.
You will also find a 20-digits setup code that you can type in manually (if you cannot scan the QR code on your device)
For Merchant Deployments:
If you're developing an app for other Mollie merchants, they need to:
- Install both your App and Mollie Tap
- Pair the Tap App with their own Mollie account using their pairing code
Multiple devices can be paired using the same pairing code, allowing efficiently onboarding multiple devices.
Step 3: Implement message signing
Secure communication between your App and Mollie Tap requires message signing. This involves:
Signing Outgoing Messages:
- Arrange all parameters of the message (including
secret ID) in alphabetical order by name - Convert all parameter values to
strings - Convert the collection of parameters into a
JSONobject string - Generate an
HMACsignature usingSHA-256and your secret key - Add this signature to the message as a signature parameter
Verifying Incoming Messages:
When receiving messages from Mollie Tap:
- Extract the signature parameter from the received message
- Follow the signing process using the remaining parameters to generate your own signature
- Verify that the received signature matches your generated signature
import java.util.Formatter
import javax.crypto.Mac
import javax.crypto.spec.SecretKeySpec

class HmacSignatureHelper(secret: String) {
    private val mac = Mac.getInstance("HmacSHA256")

    init {
        mac.init(SecretKeySpec(secret.toByteArray(), "HmacSHA256"))
    }

    fun sign(input: String): String {
        return formatBytesToString(mac.doFinal(input.toByteArray()))
    }

    fun verify(input: String, signature: String): Boolean {
        return sign(input) == signature
    }

    private fun formatBytesToString(bytes: ByteArray): String {
        val formatter = Formatter()
        bytes.forEach { formatter.format("%02x", it) }
        return formatter.toString()
    }
}
Step 4: Initiate payment
To process a payment, your App needs to send an app-to-app intent to Mollie Tap:
- Create a payment request with required details
- Sign the payment request
- Send an intent to Mollie Tap
Payment Request Parameters
| Parameter | Required | Type | Description | Example |
|---|---|---|---|---|
amount | Yes | Object | Payment amount information | |
amount.currency | Yes | String | Three-letter ISO currency code | EUR |
amount.value | Yes | String | String representation of the amount | 10.00 |
appId | Yes | String | Your Android application bundle ID | com.example.myapp |
applicationFee | No | Object | null | Specifies a fee that your application will receive (for Mollie Connect integrations only) | |
applicationFee.amount | Yes | Object | Fee amount information | |
applicationFee.amount.currency | Yes | String | Three-letter ISO currency code (must match payment currency) | EUR |
applicationFee.amount.value | Yes | String | String representation of the fee amount | 0.50 |
applicationFee.description | Yes | String | Description of what the fee is for | Service fee |
description | Yes | String | Customer-facing payment description | Order #1234 |
referenceId | No | String | Your unique reference for this transaction. Maximum 255 characters. | order_1234567890 |
secretId | Yes | String | The secret ID provided by Mollie | possecr_5SiRqgL7EL3kdj9eLPVUK |
webhookUrl | No | String | URL that will receive HTTP POST notifications about payment status changes. Must be accessible from the internet. | https://example.com/webhook/mollie |
The Payload JSON Structure
The payment request is sent as a JSON payload within the intent. This payload consists of:
- Payment parameter - all the payment parameters (required and optional) organized as a single
JSONobject. - Signature parameter - the
HMAC-SHA256string signed using the payment request.
{
    "amount": {
        "currency": "EUR",
        "value": "10.00"
    },
    "appId": "com.example.myapp",
    "description": "Order #1234",
    "referenceId": "order_1234567890",
    "secretId": "possecr_5SiRqgL7EL3kdj9eLPVUK",
    "webhookUrl": "https://example.com/webhook/mollie"
}
This complete JSON is then sent to Mollie Tap as a payload string parameter in the intent.
Optional: Monetizing with Application Fee
If you're processing payments on behalf of other Mollie merchants (using Mollie Connect), you can add an Application fee to the payment:
{
    "amount": {
        "currency": "EUR",
        "value": "10.00"
    },
    "appId": "com.example.myapp",
    "applicationFee": {
        "amount": {
            "currency": "EUR",
            "value": "0.50"
        },
        "description": "Service fee"
    },
    "description": "Order #1234",
    "referenceId": "order_1234567890",
    "secretId": "possecr_5SiRqgL7EL3kdj9eLPVUK",
    "webhookUrl": "https://example.com/webhook/mollie"
}
Important considerations for Application Fees:
- The fee currency must match the payment currency
- Ensure your fee leaves enough room for Mollie's processing fees
- The fee amount will be automatically deducted from the merchant's payment and transferred to your account
- The fee description will appear in your platform transactions
import kotlinx.serialization.json.Json

private const val PAYMENT_REQUEST_CODE = 1015 // Can be any integer value

private val json = Json {
    coerceInputValues = false  // Don't allow type coercion
    encodeDefaults = true  // Always include default values
    explicitNulls = true  // Be explicit about null values
    ignoreUnknownKeys = false  // Don't allow extra fields
    isLenient = false  // Strict JSON parsing
    prettyPrint = false  // Avoid additional whitespace
}

private val signatureHelper = HmacSignatureHelper("your-secret-key")

fun main() {
    val paymentRequest = PaymentRequest(
        amount = Amount("EUR", "0.01"),
        appId = "com.example.myapp",
        applicationFee = null, // Add fee, if needed
        description = "This is an example description",
        referenceId = UUID.randomUUID().toString(),
        secretId = "possecr_5SiRqgL7EL3kdj9eLPVUK",
        webhookUrl = "https://example.com/webhook/mollie"
    )

    val paymentRequestString = json.encodeToString(PaymentRequest.serializer(), paymentRequest)

    startActivityForResult(Intent().apply {
        component = ComponentName(
            "com.mollie.pos",
            "com.mollie.pos.MainActivity"
        )
        putExtra("payload", paymentRequestString)
        putExtra("signature", signatureHelper.sign(paymentRequestString))
    }, PAYMENT_REQUEST_CODE)
}
Step 5: Handle payment results
After processing the payment, Mollie Tap will return the following information:
Payment Result Parameters
| Parameter | Required | Type | Description | Example |
|---|---|---|---|---|
failureMessage | Yes | String | null | Customer-friendly explanation of why the payment failed | Insufficient funds |
failureReason | Yes | String | null | Machine-readable failure code | T.12500.-81 |
paymentId | Yes | String | null | Mollie's unique payment ID (may be null, for example, if there’s no connectivity) | tr_WDqYK6vllg |
referenceId | Yes | String | null | Your original reference ID | order_1234567890 |
signature | Yes | String | Message signature for verification | a1b2c3d4e5f6g7h8i9j0... |
status | Yes | String | Payment status (paid or failed) | paid |
Handling the result in your App
override fun onActivityResult(requestCode: Int, resultCode: Int, intent: Intent?) {
    super.onActivityResult(requestCode, resultCode, intent)

    if (intent == null || requestCode != PAYMENT_REQUEST_CODE) {
        return
    }

    val failureMessage = intent.getStringExtra("failureMessage")
    val failureReason = intent.getStringExtra("failureReason")
    val paymentId = intent.getStringExtra("paymentId")
    val referenceId = intent.getStringExtra("referenceId")
    val signature = intent.getStringExtra("signature")
    val status = intent.getStringExtra("status")

    if (signature == null) {
        // handleMissingSignature()
        return
    }

    val paymentResult = PaymentResult(failureMessage, failureReason, paymentId, referenceId, status)

    val paymentResultString = json.encodeToString(PaymentResult.serializer(), paymentResult)

    if (!signatureHelper.verify(paymentResultString, signature)) {
        // handleInvalidSignature()
        return
    }

    when (status) {
        "paid" -> {
            // Do something in your codebase when the payment is paid
            handleStatusPaid(paymentId, referenceId)
        }
        "failed" -> {
            // Do something in your codebase when the payment has failed
            handleStatusFailed(failureMessage, failureReason)
        }
    }
}
Important Considerations when handling results:
- Verify the signature: always verify the signature to ensure the response is authentic
- Rely on webhooks: the app-to-app intent might not return if the payment process is interrupted
- Handle all statuses: implement handling for all possible payment statuses
- Check for app installation: the intent fails if Mollie Tap is not installed
Step 6: Implement webhook handling
Webhooks allow your application to receive real-time updates about the status of payments and other objects in the Mollie system. Instead of constantly polling for status changes, webhooks push notifications to your application when events occur.
How webhooks work with Tap to Pay integration
When integrating with our partner platform, webhooks work as follows:
- During payment creation, the webhook URL is automatically configured based on your platform settings
- When a payment status changes (e.g., from
pendingtopaid), Mollie sends aPOSTrequest to your webhook URL - The
POSTrequest contains a single parameter:idwith the value of the payment ID (e.g.,id=tr_d0b0E3EA3v) - Your application uses this
idto fetch the latest payment status from Mollie's API - Based on the updated status, you can trigger actions in your system (e.g., fulfill orders, update inventory etc)
Example webhook request
POST /payments/webhook HTTP/1.0
Host: yourdomain.example.org
Content-Type: application/x-www-form-urlencoded
Content-Length: 16

id=tr_d0b0E3EA3v
Implementation best practices:
- Always verify latest payment status: always fetch payment's current (latest) status using the Get payment API endpoint
- Return 200 OK response: Mollie expects a
200 OKresponse to confirm receipt of the webhook - Handle idempotency: the same webhook might be sent multiple times, so ensure your processing logic can handle duplicates
- Implement error handling: if your endpoint is temporarily unavailable, Mollie will retry several times
- Asynchronous handling: it’s possible that the webhook will be sent earlier than the intent result
For more detailed information about webhooks (including advanced configuration options and troubleshooting), refer to Webhooks.
Testing your integration
Before deploying to production, test your integration thoroughly:
- Test app-to-app communication with Mollie Tap
- Verify signature generation and validation
- Test all payment scenarios (success, failure, cancellation etc)
- Verify webhook handling on your backend
- Test error scenarios (app not installed, network issues, etc.)
Troubleshooting
If the problem you are facing is not listed below, please contact our Support team.
Mollie Tap not found
If the intent fails because Mollie Tap is not installed, direct the user to install it from the Google Play Store.
Payment flow interrupted
If the payment flow is interrupted (device shutdown, app crash, etc.), always check the webhook status before considering a payment failed. Currently, we don’t have support for app-to-app intent to request a payment status.
Signature validation errors
Double-check that:
- All parameters are ordered alphabetically by name
- All values are properly converted to
strings - The correct secret key is being used
Device connectivity
Payment processing requires internet connectivity. Implement proper error handling for offline scenarios.
Version compatibility
Ensure you're using the latest version of Mollie Tap. Some features may not work with older versions.
Data Structures reference
import kotlinx.serialization.Serializable

@Serializable
data class Amount(
    val currency: String,
    val value: String
)

@Serializable
data class ApplicationFee(
    val amount: Amount,
    val description: String
)

@Serializable
data class PaymentRequest(
    val amount: Amount,
    val appId: String,
    val applicationFee: ApplicationFee?,
    val description: String,
    val referenceId: String,
    val secretId: String,
    val webhookUrl: String?
)

@Serializable
data class PaymentResult(
    val failureMessage: String?,
    val failureReason: String?,
    val paymentId: String?,
    val referenceId: String?,
    val status: String,
)
Additional support and resources
If you encounter issues with your integration, refer to the following resource: Android Intent Documentation or contact our Support team.
Updated 1 day ago