Custom checkout with Components (Beta)
Build a your own checkout with embeddable payment interfaces.
This feature of Mollie Components is in private beta.If you are interested in early access you can reach out to us.
Mollie Components is a suite of pre-built UI components you can embed in your own checkout to accept payments. The components handle complex interactions like card input, 3DS challenges and express checkout so you don't have to build them yourself.
How it works
Mollie Components is a JavaScript SDK that mounts UI elements to your checkout page. It is powered by the Checkout Sessions API that facilitates the checkout process of your customer and handles payment creation.
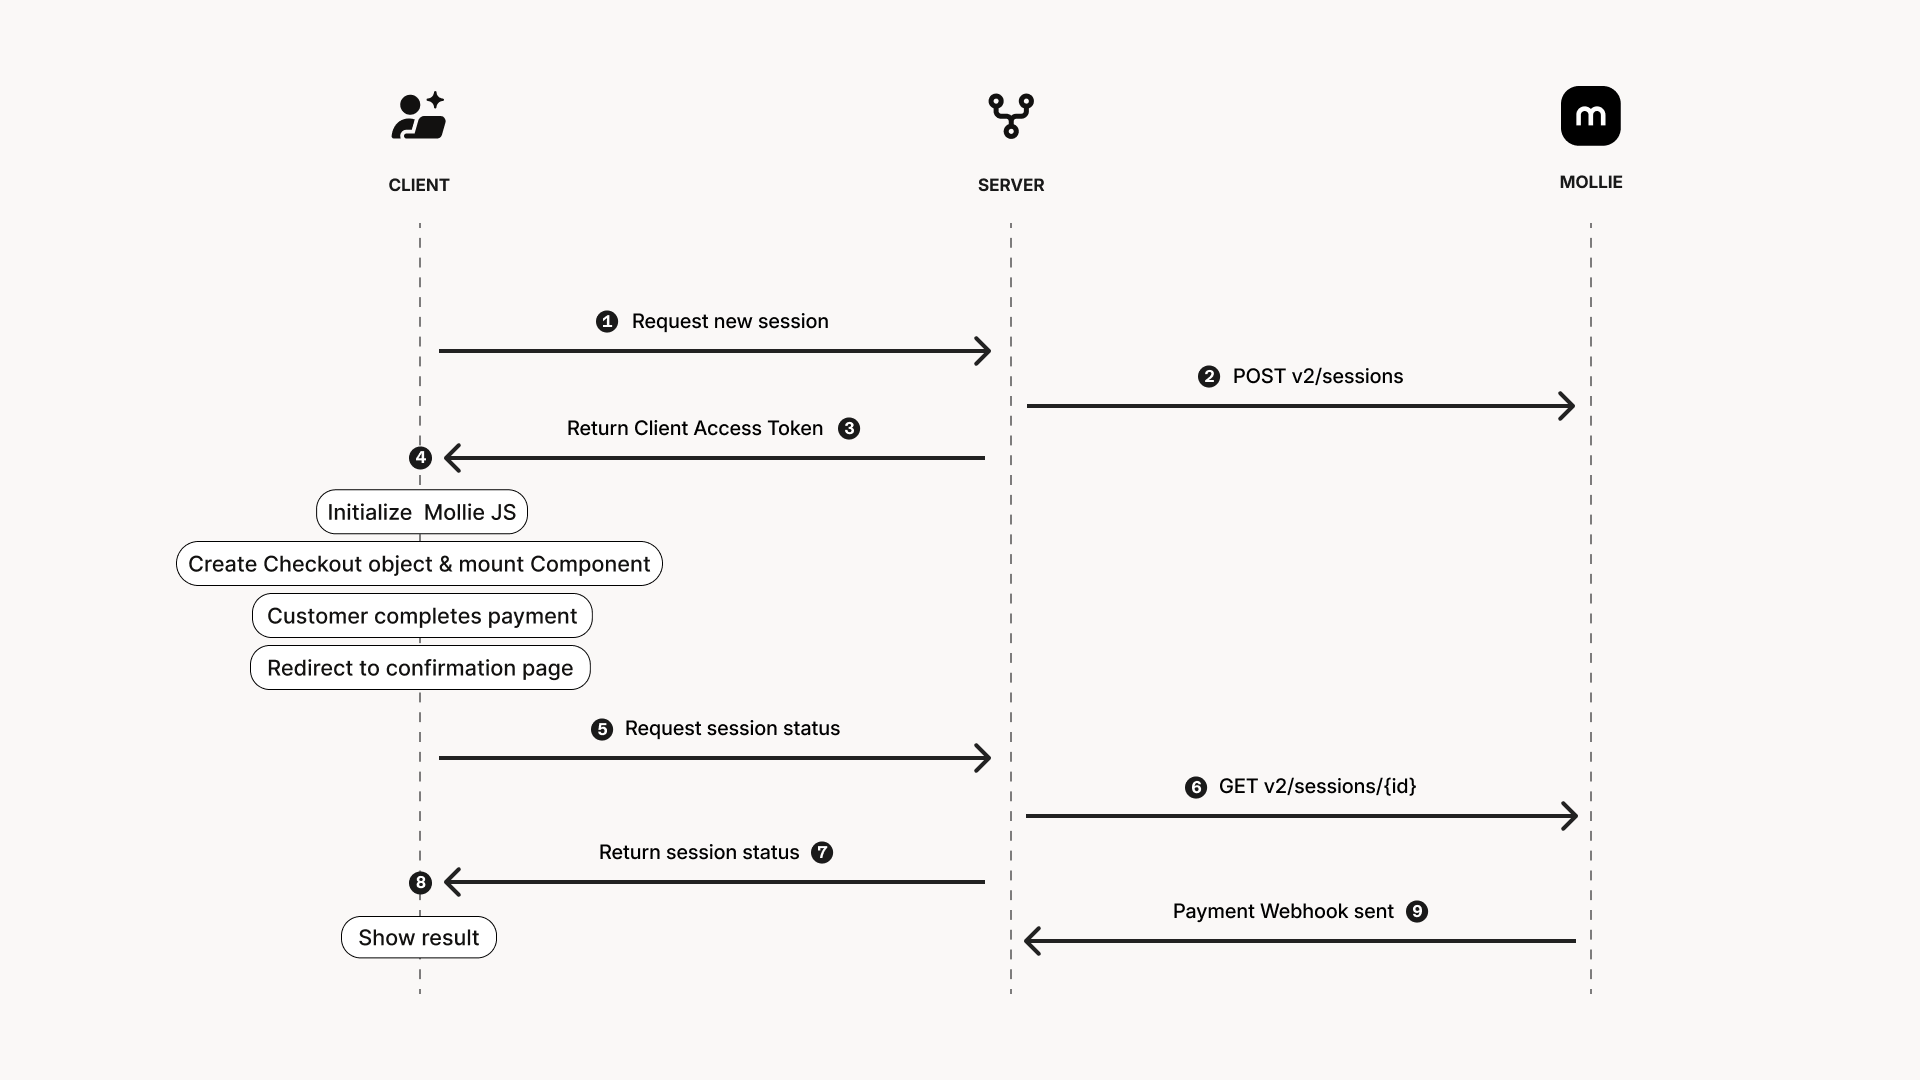
- When your customer is ready to checkout, you request a new Checkout Session from your server.
- Your server calls the Checkout Sessions API to create a new Checkout Session providing information such as amount, line items and a redirect URL.
- You send the Client Access Token from the Checkout Session to your front-end.
- In your front-end you initialize Mollie JS and mount a component.
- Your customer interacts with the component and completes the payment.
- Your customer is redirected upon completion.
- From your result page you request the status of the Checkout Session from your server.
- Your server calls the Checkout Sessions API to retrieve the Checkout Session.
- You return the status of the Checkout Session and show the outcome to your customer.
- Mollie will send a webhook for the Payment which can trigger fulfillment.
Create a Checkout Session from your Server
The Checkout Session represents your customer's flow through the checkout process. It communicates with Mollie Components to facilitate a smooth and secure checkout process. Create a new Checkout Session for every checkout attempt of your customer.
To create a Checkout Session make a request to the Checkout Sessions API. Include the following required fields in your request. See the Create Checkout Session reference for all properties.
| Property | Description | Required |
|---|---|---|
amount | Final amount your customer will need to pay. | ✅ |
description | A human friendly description for the checkout session. | ✅ |
lines | An array of line item objects with information about the products bought. | ✅ |
redirectUrl | The URL where your customer will be redirected to once they complete the payment. | ✅ |
Always make sure to calculate and set the amount from your server to prevent tampering from the client side.
curl -X POST https://api.mollie.com/v2/sessions \
    -H "Authorization: Bearer live_dHar4XY7LxsDOtmnkVtjNVWXLSlXsM" \
    -d "amount[currency]=EUR" \
    -d "amount[value]=10.00" \
    -d "description=Order #12345" \
    -d "lines[0][description]=T-Shirt" \
    -d "lines[0][quantity]=1" \
    -d "lines[0][unitPrice][value]=10.00" \
    -d "lines[0][unitPrice][currency]=EUR" \
    -d "lines[0][totalAmount][value]=10.00" \
    -d "lines[0][totalAmount][currency]=EUR"\
    -d "redirectUrl=https://webshop.example.org/order/12345/" \
    -d "metadata={\"order_id\": \"12345\"}"
The created Session will include a clientAccessToken that is needed to initialize Mollie Components. Make sure to send this token to your front-end.
You may need to trigger fulfilment based on the status of the payment. Set the
payment.webhookUrlproperty to ensure you receive status updates via a webhook.
Add a Component to your checkout page
Mollie Components is a JavaScript SDK that allows you to embed UI elements into your checkout page. You can create and embed multiple components with a single Checkout Session. Mollie Components will handle all the interactions with your customer like collecting card details or showing interfaces for express payment methods. Depending on the payment method it may redirect the customer to complete the payment.
Prepare your front-end
Start by including Mollie.js on your checkout page.
<script src="https://js.mollie.com/v2/mollie.js"></script>If you need both
v1andv2of Mollie.JS you can loadv2in compatibility mode to prevent namespace conflicts:https://js.mollie.com/v2/mollie.js?compatible.
On your checkout page add a DOM element where the component will be mounted.
<div id="mollie-component"></div>If you are using Content Security Policy, you should whitelist the
js.mollie.comdomain (e.g.script-src https://js.mollie.comandframe-src https://js.mollie.com). We recommend using a strict CSP on your checkout.
Create a Checkout object
The Checkout object is the client side representation of your customer's checkout session. It can be used to create new components or setup event listeners.
To create a Checkout object you will need the clientAccessToken from the Checkout Session. This ensures the client side component can communicate with Mollie. Additional options like locale can be passed as well.
const checkout = Mollie.Checkout(clientAccessToken, { locale: 'en-US' })
Compatibility modeIf you have loaded Mollie.js in compatibility mode, you can initialize by calling
Mollie2.Checkout(clientToken, options?)
Optional: Trigger side effect when your customer submits.
You can add a listener for a submit event to trigger any side effects before the payment is being processed. This can be useful if you need to do a stock reservation or if you want to already create an order in your back-end.
checkout.on('submit', (event) => {
  event.defer()
  try {
    await reserveStock()
    event.resolve()
  } catch(err) {
    event.reject()
  }
})
Create and mount a Component
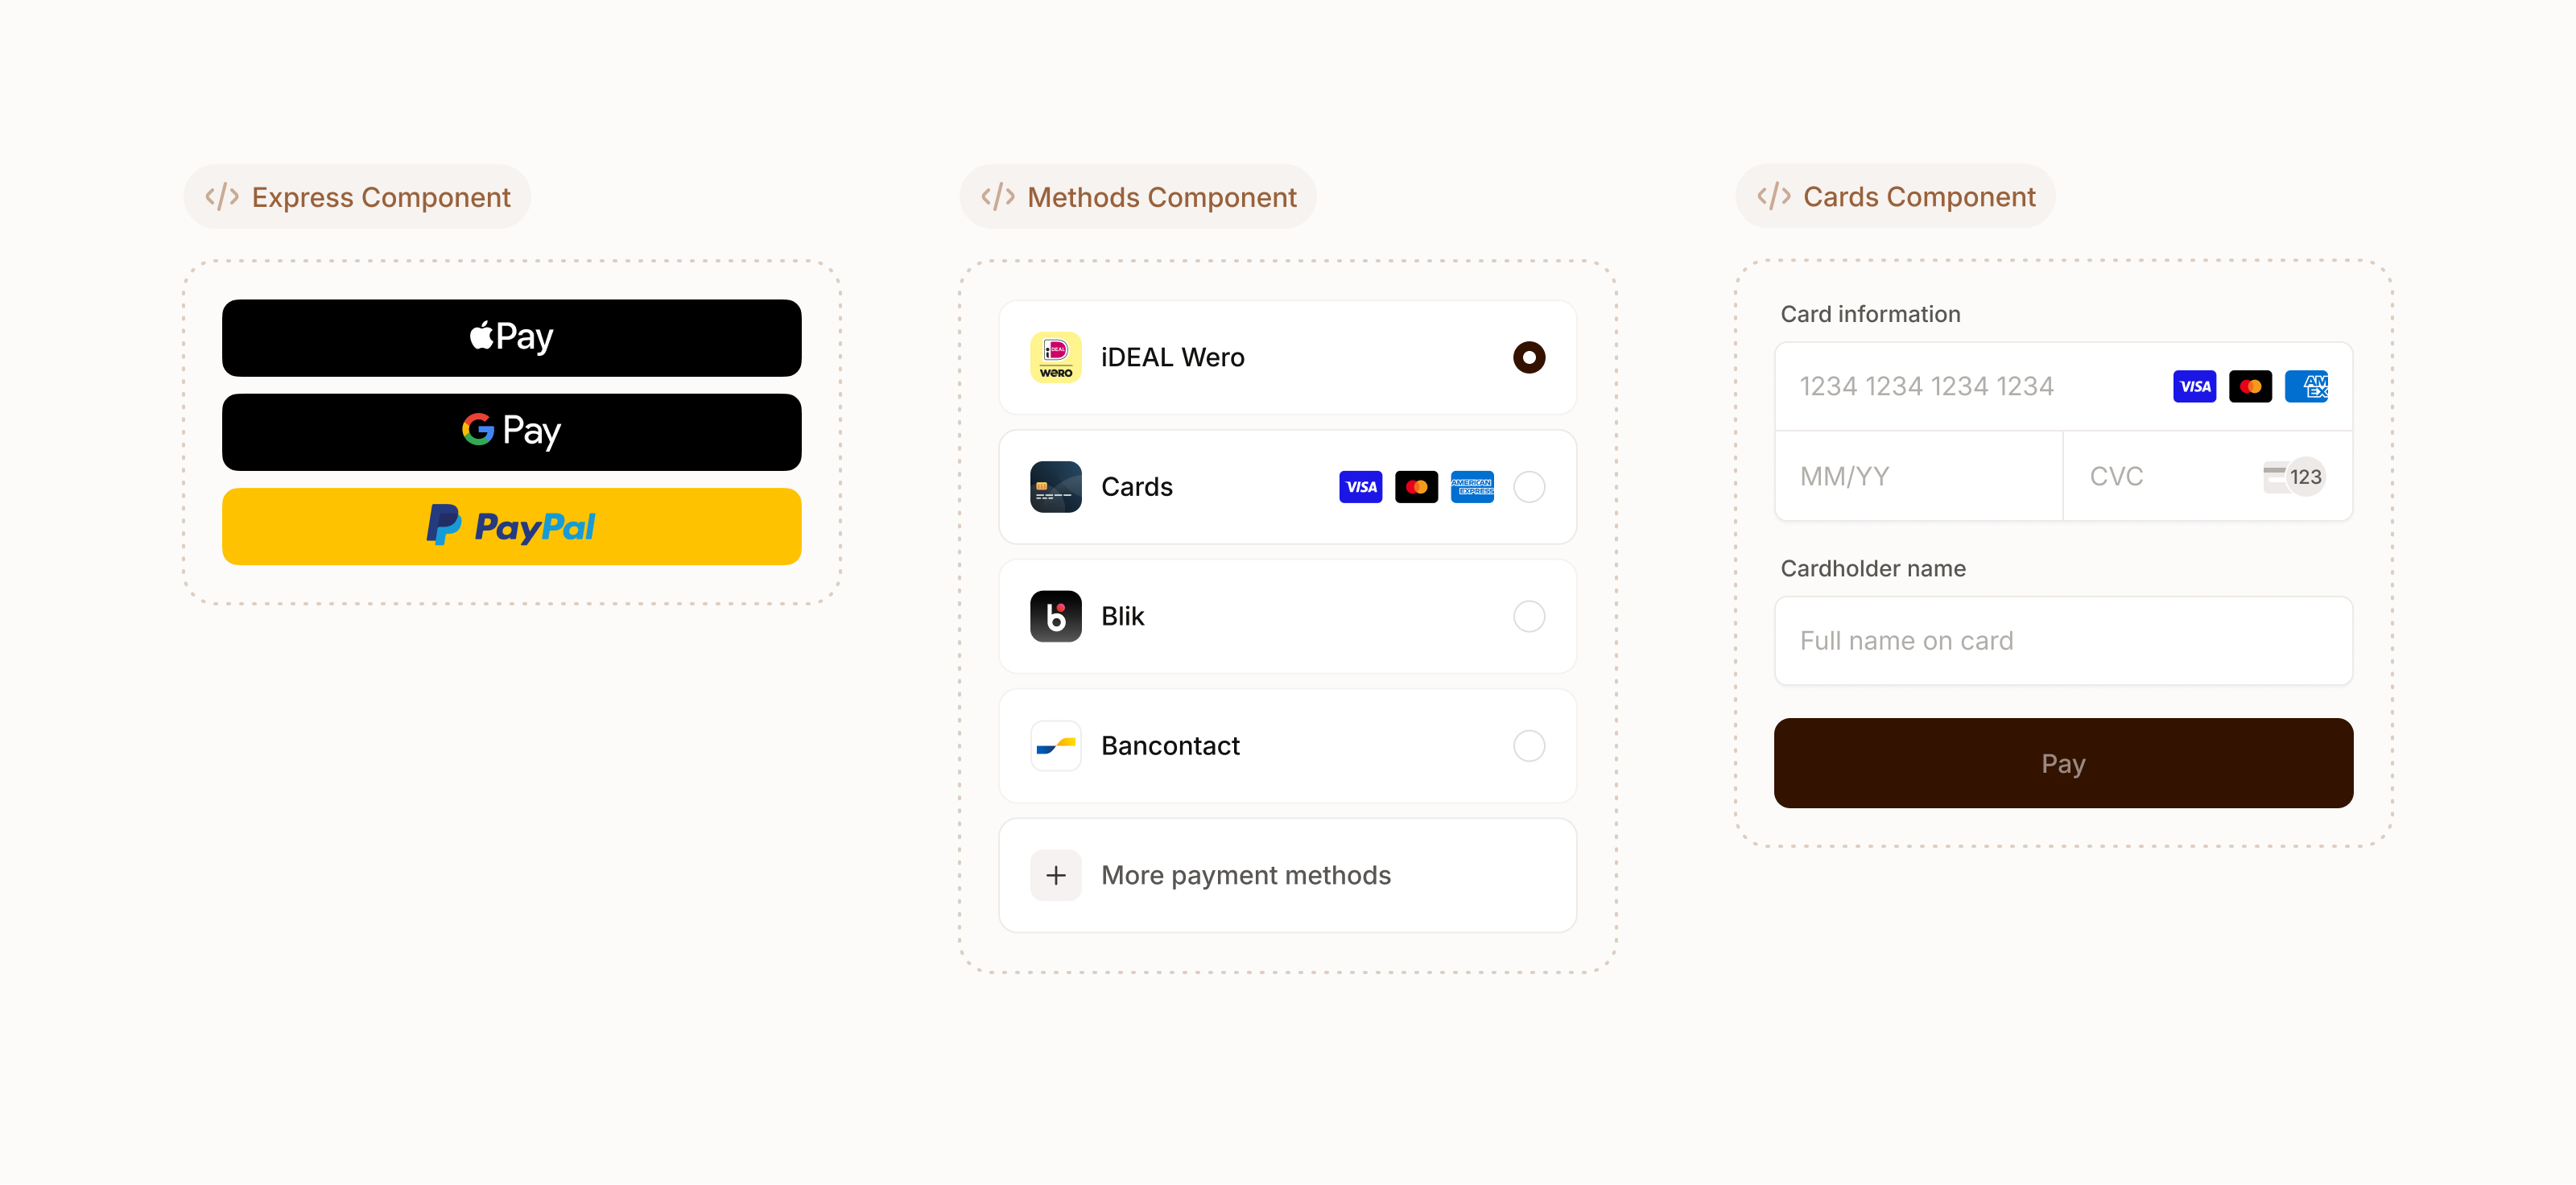
Mollie offers several components for different use cases. With the Checkout object a component can be created and mounted to your DOM. It is possible to create multiple components with a single Checkout object.
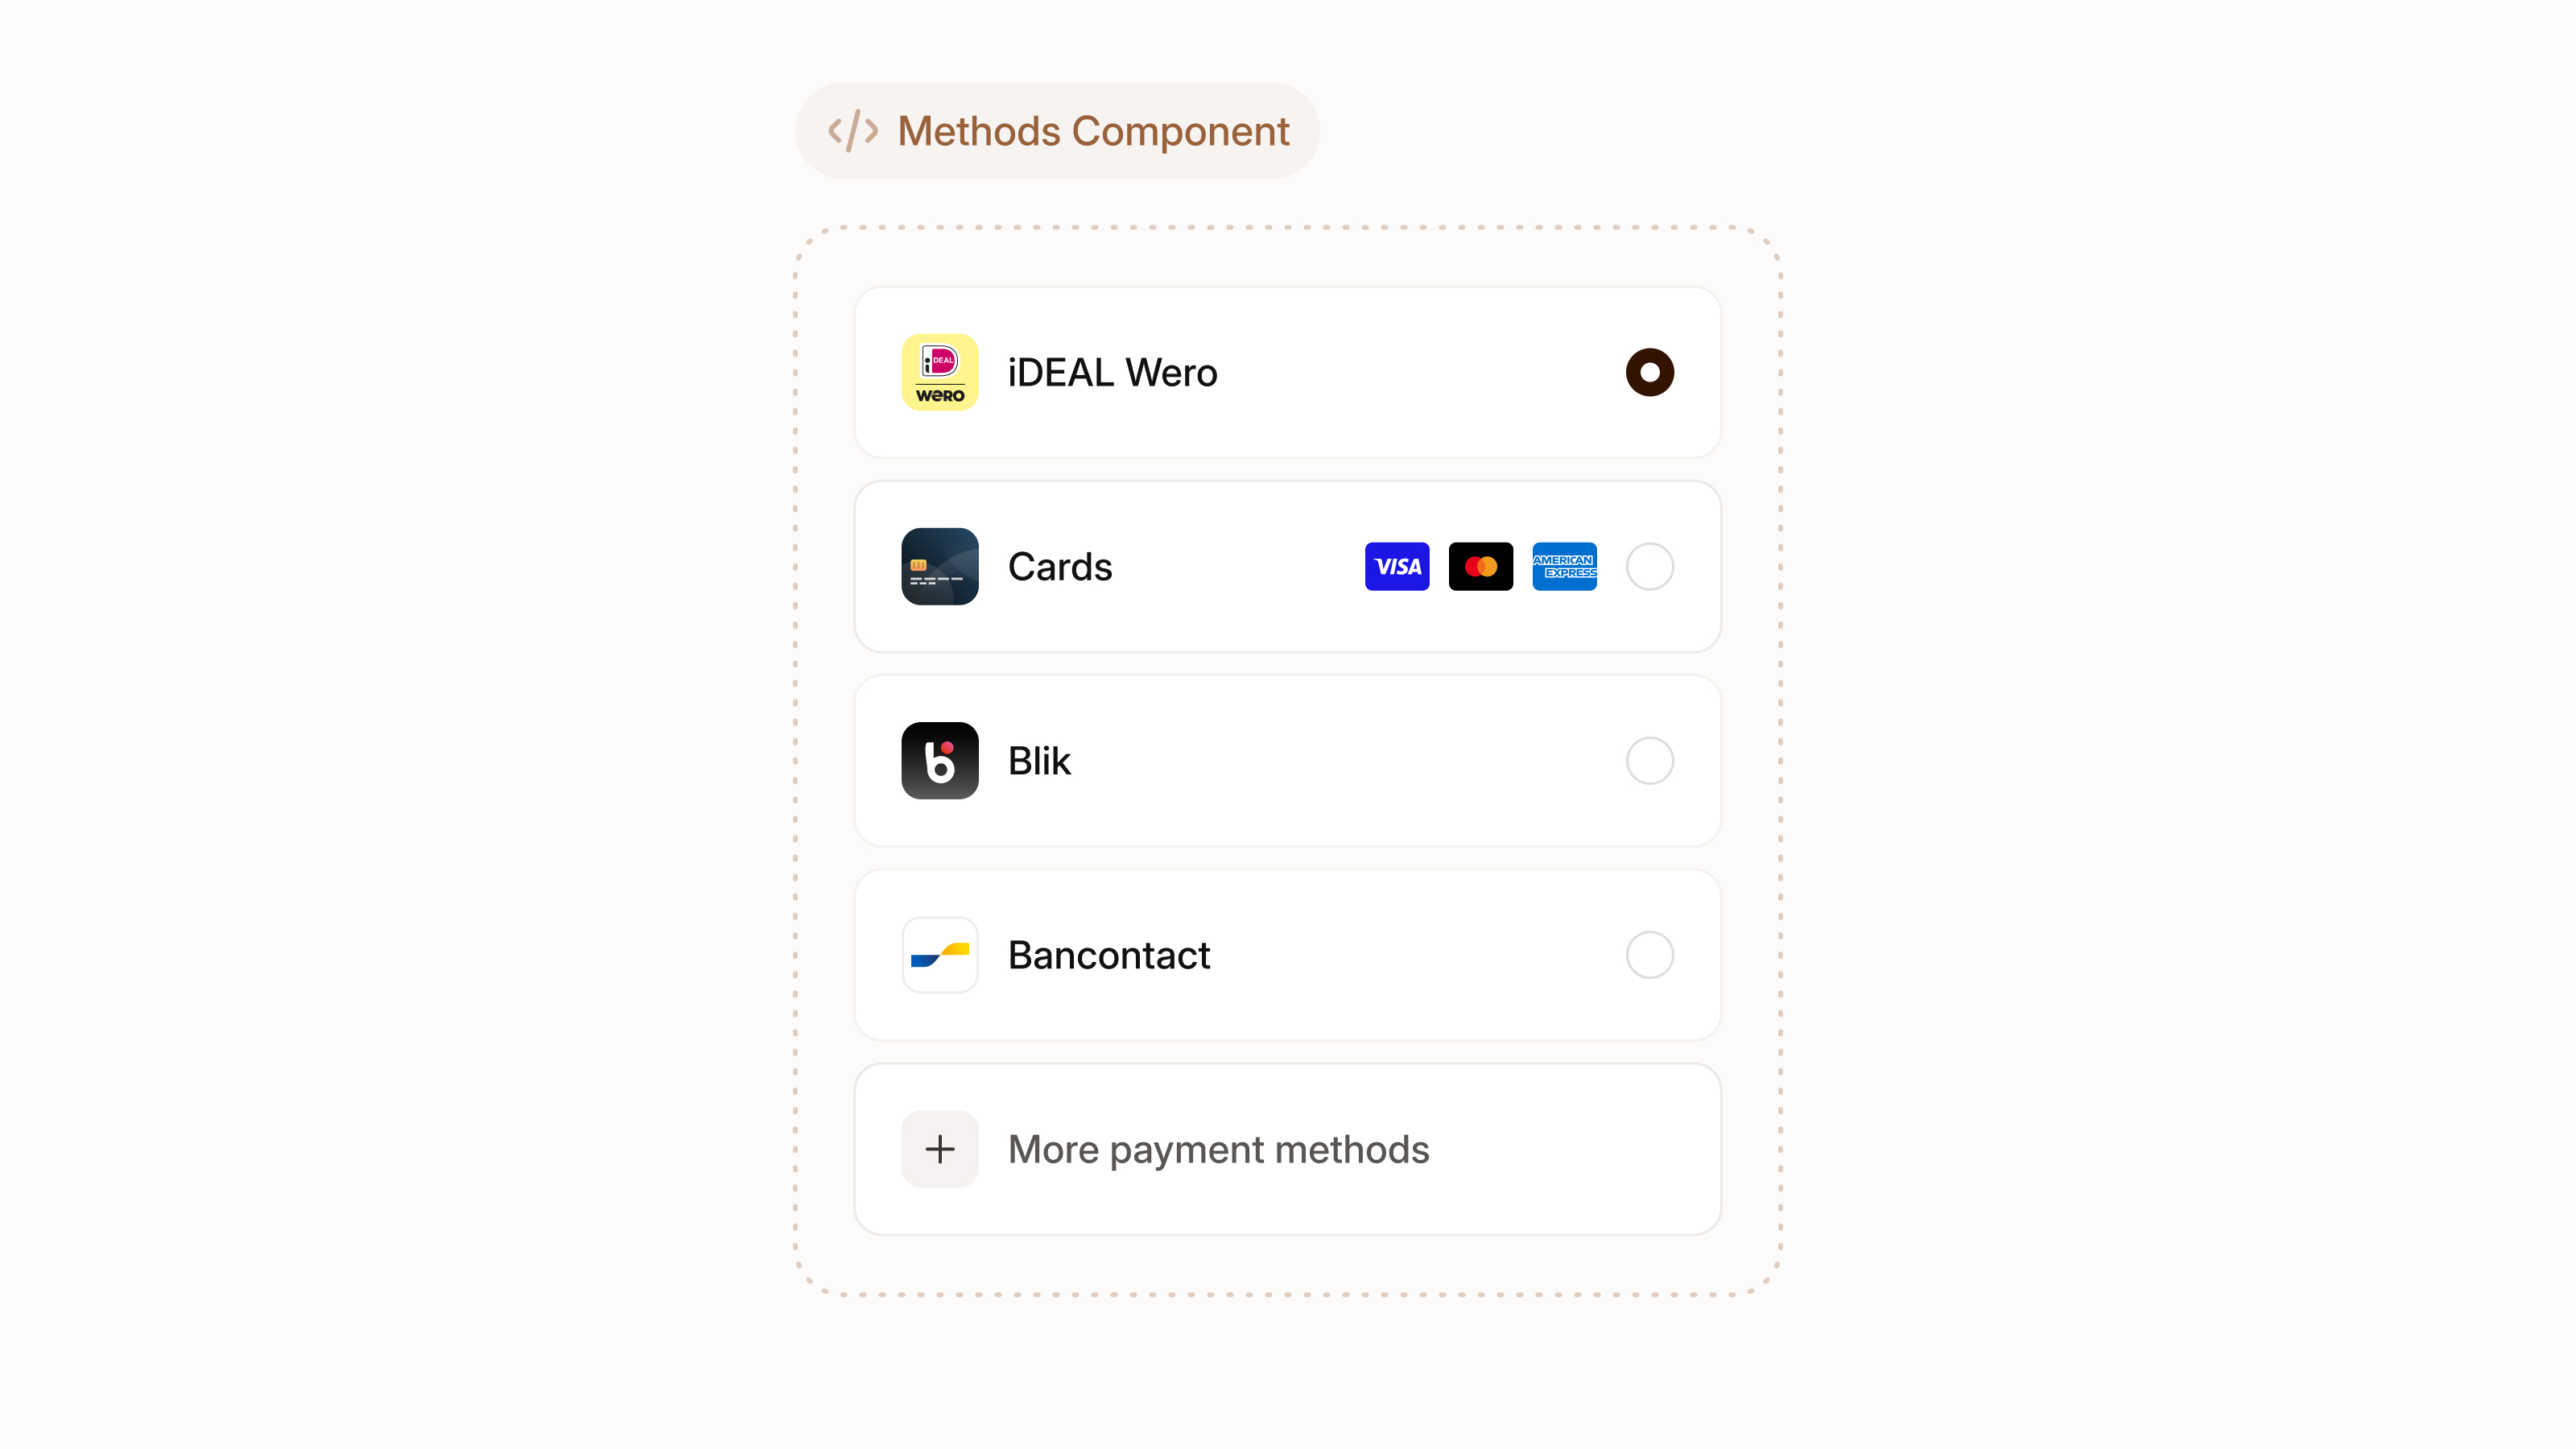
A component that renders a list of available payment methods the customer can choose from. For payment methods that require additional information, such as cards, the component will automatically show the correct input fields.
The Methods Component currently supports the following payment methods: bancomatpay, bancontact, belfius, blik, creditcard, eps, ideal, mbway, multibanco, mybank, paysafecard, satispay, swish, twint.
const methodsComponent = checkout.create('methods-component')
methodsComponent.mount(document.getElementById('mollie-component'))
A component that renders payment buttons for express checkout. Supports Apple Pay, Google Pay and PayPal.
Apple Pay requires you to serve your checkout over HTTPS and place a domain validation file on the domain you want to use Apple Pay. The presence and validity of this file will be validated by Apple. Download the domain validation file and place it on your server at
https://[domain]/.well-known/apple-developer-merchantid-domain-association.
The component will automatically show all available buttons. You can hide specific buttons by setting the visibility property to hidden in the options object.
const options = {
  buttons: {
    googlepay: {
      visibility: 'hidden'
    }
  }
}
const expressComponent = checkout.create('express-checkout', options)
expressComponent.mount(document.getElementById('mollie-component'))
Collecting shipping detailsThe Express Component does currently not support shipping options.
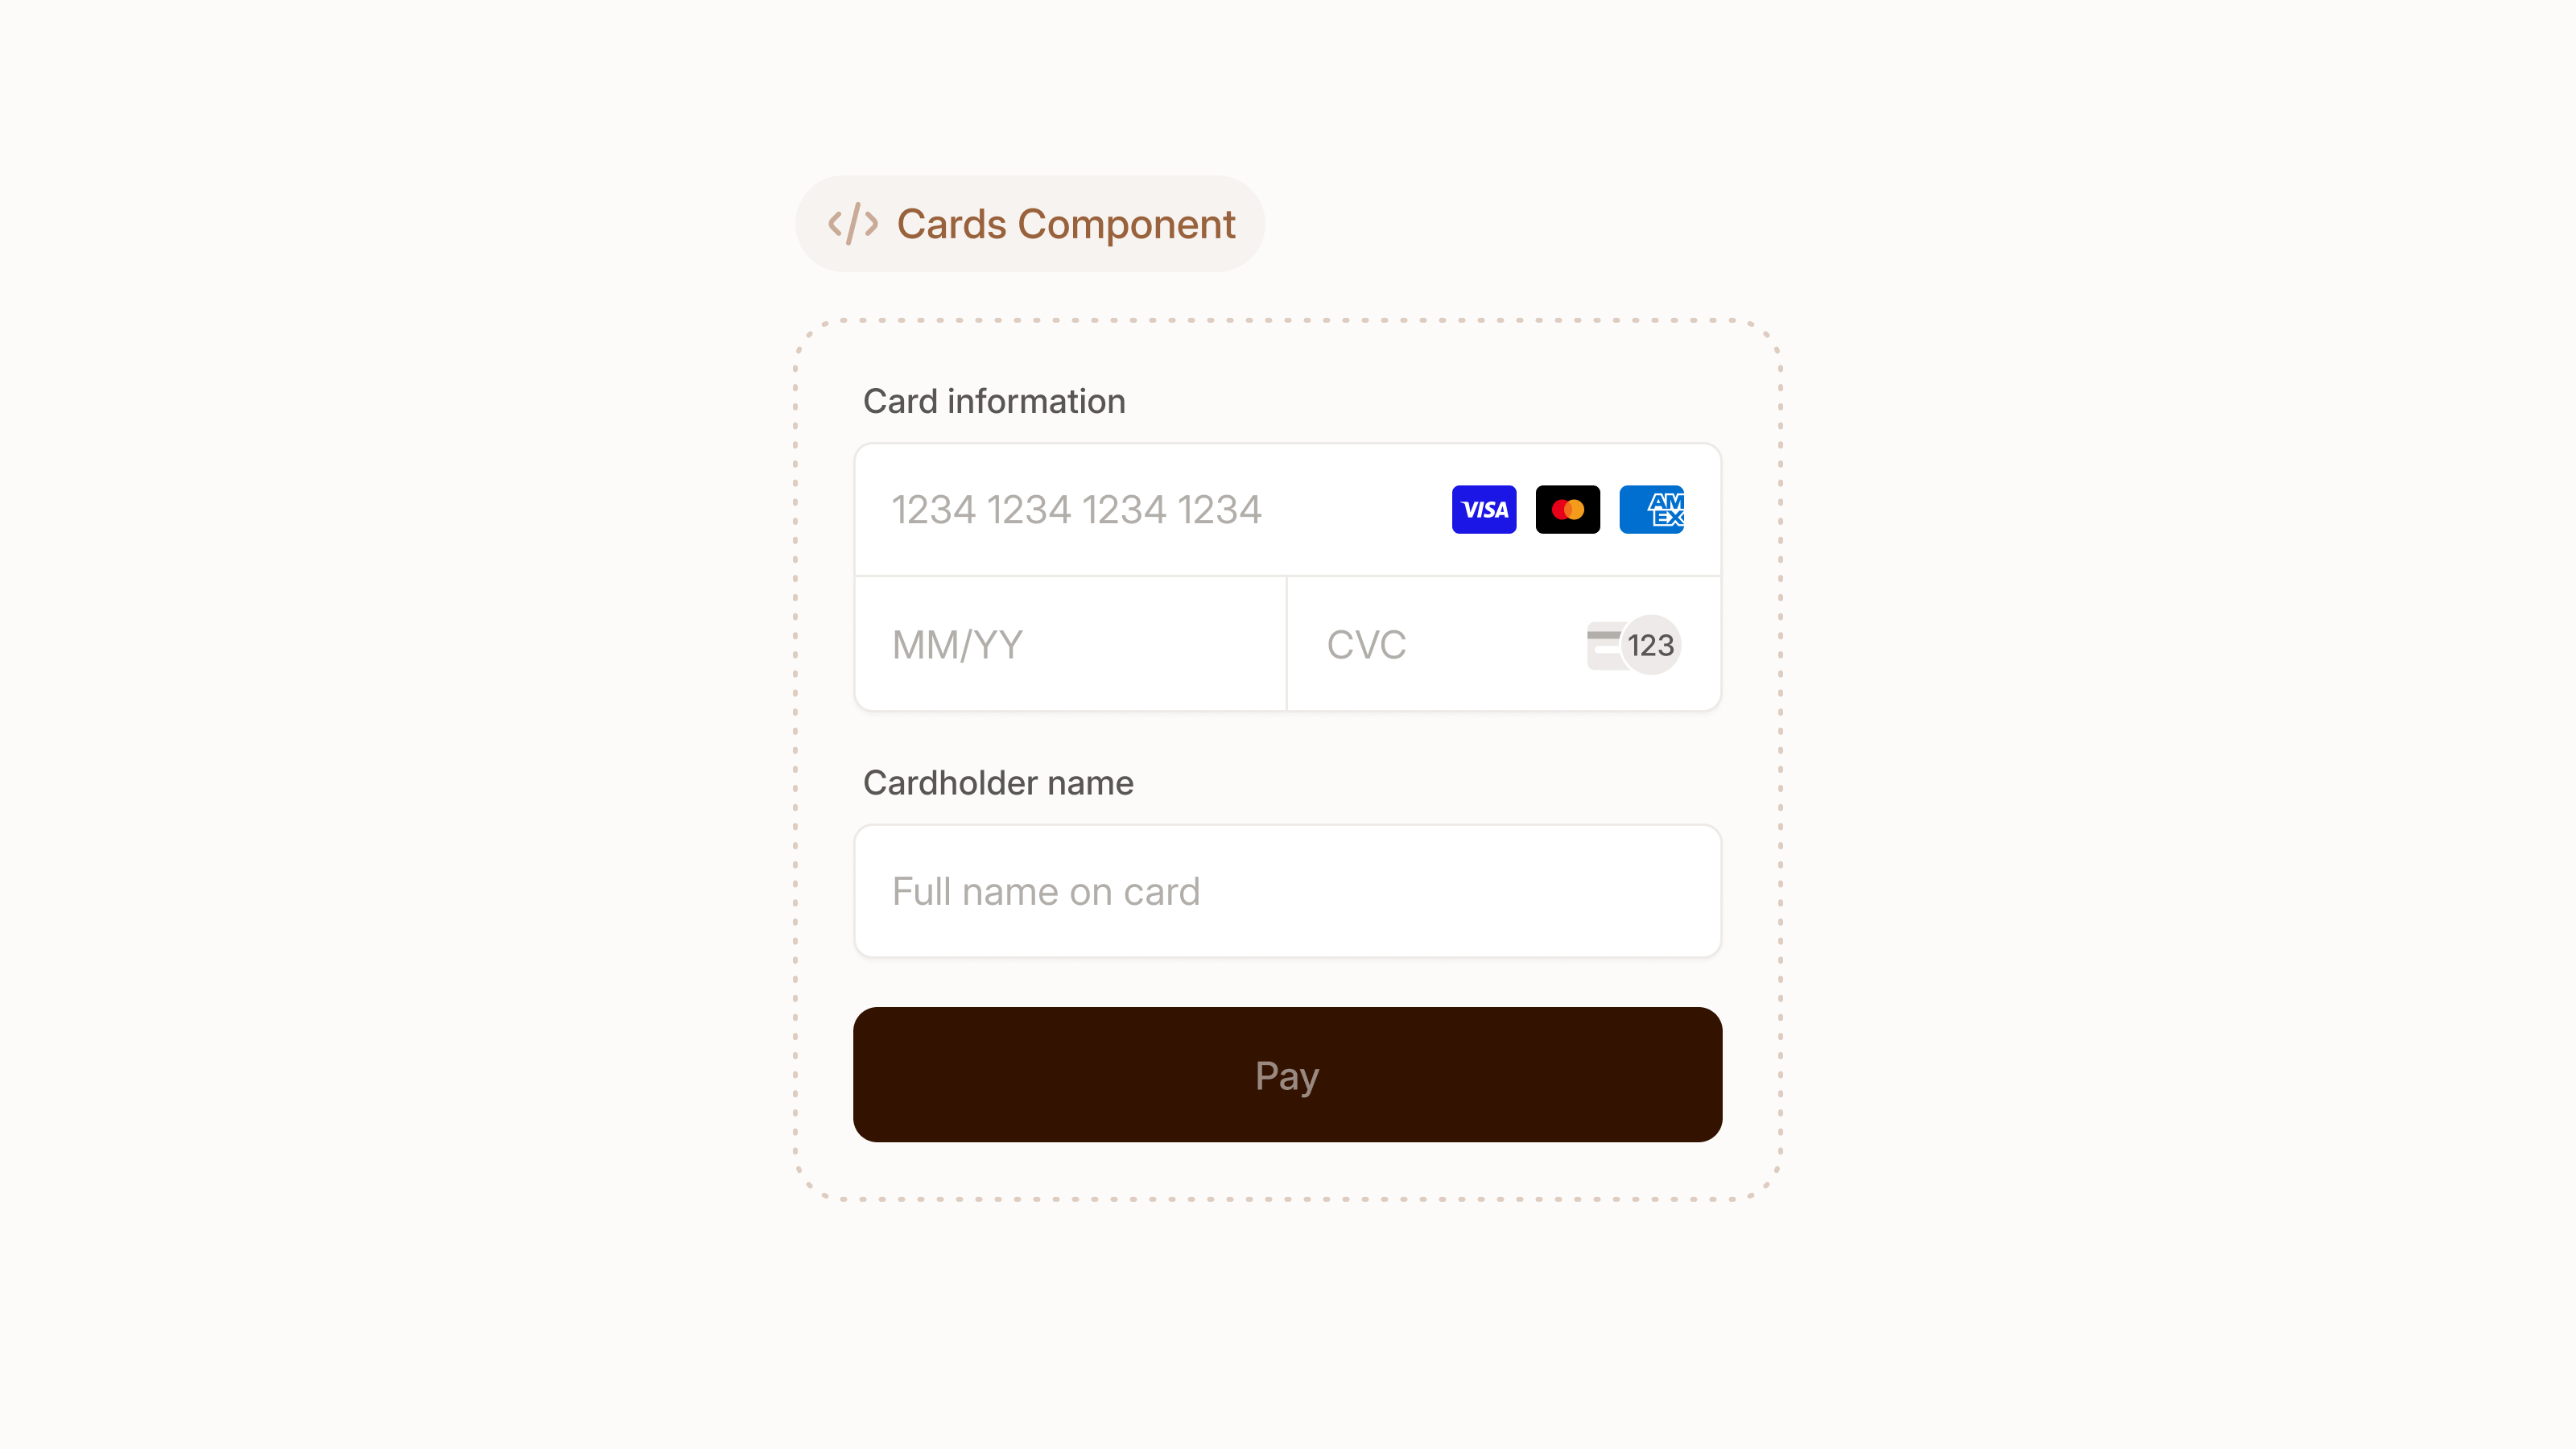
A stand-alone Card Component to accept card payments securely, compliant and frictionless. It supports advanced features out of the box such as embedded 3DS challenges and support for co-branded cards.
const cardComponent = checkout.create('card')
cardComponent.mount(document.getElementById('mollie-component'))
Handle the result
Mollie Components will facilitate the entire payment process. Once all information is available to process the payment, a new Payment will be created automatically from the Checkout Session. When the process is completed you show the outcome to the customer and trigger any fulfilment logic.
Show the result to your customer
When your customer has completed the payment they will be redirected to the redirectUrl you provided on the Checkout Session. From your server you can call the Checkout Sessions API to retrieve its status which you can use to inform your customer of the outcome.
The Checkout Session can have one of the following states:
| Status | Description |
|---|---|
open | The customer did not complete the checkout, send your customer back to the checkout. |
expired | The customer did not complete the checkout and the session is expired. You will have to create a new Checkout Session. |
completed | The customer completed the checkout successfully. |
Triggering fulfilment
Fulfilment can be triggered asynchronously based on the webhook of the Payment. You will receive this webhook if you provided a payment.webhookUrl on the Checkout Session. Use this webhook to determine the status of the Payment and execute your fulfilment process.
Any provided
metadataon the Checkout Session will also be available on the Payment. You can use this to link the Payment to the order in your system.
Limitations
Mollie Components is still being developed and new features are added constantly. Currently known limitations include:
- Limited payment method support, see the Create and mount a Component section.
- The appearance of the components cannot be customized.
- The Express Component does not support offering shipping options.
- Test-mode support is limited.
Updated 1 day ago