
Onboard merchants
Client Links are the recommended way to onboard merchants as it turns Mollie's onboarding into a pre-filled, on-brand process inside your own product. It allows for a seamless and automated onboarding experience of all new customers and does the heavy-lifting for you.
Marketplaces: Mollie Connect for Marketplaces onboarding framework applies to legal entities only. Private individuals cannot be onboarded as connected sub-merchants.
Why Client Links
- Higher conversion: the authorization screen arrives pre-filled with the merchant's details, so there is less to type and fewer drop-offs.
- Your brand, not a redirect: co-branded onboarding carries your logo and branding, so it feels like a native part of your product and builds trust.
- Less work, fewer errors: Mollie creates the merchant's organization for you and removes data-entry mistakes, so you can go live faster.
- Pre-filled KYB: business details you supply through the Client Links API appear on Mollie's verification screens, so merchants complete their onboarding faster.
Prerequisites
You need the Client ID and Client Secret from your registered OAuth app. If you have not registered your app yet, see Authentication (via OAuth) first.
Step 1: Create Client Link
Use the Client Links API to generate a personalized authorization link for your merchant. Call the Create Client Link endpoint with the following business details:
- Personal:
email,givenName,familyName,locale - Business:
organizationName,address,registrationNumber,vatNumber
Mollie returns a clientLink URL in response. A Client Link creates the merchant's organization for you, pre-fills their information on the authorization screen and supports co-branded onboarding. Set your logo and brand color for the OAuth app when you register it.
Step 2: Send merchant to Mollie
Append the following required parameters to the clientLink URL before redirecting your merchant:
| Parameter | Value |
|---|---|
client_id | Your app's Client ID |
redirect_uri | The URL Mollie redirects to after authorization |
response_type | code |
scope | Space-separated list of requested permissions |
state | A random value you generate to prevent CSRF attacks |
For the full parameter reference, see the Authorize endpoint docs.
Send your merchant to the resulting URL (typically behind the Connect with Mollie button in your product).
Step 3: Exchange authorization code for tokens
After the merchant authorizes, Mollie redirects them to your redirect_uri with an authorization_code in the query string. This code expires after 30 seconds.
Exchange it for tokens using the Tokens API:
access_token: valid for 60 minutes; use it to make API calls on behalf of your merchant.refresh_token: persistent; store it encrypted and use it to obtain new access tokens when the current one expires.
Once authorized, the merchant appears in your Mollie Dashboard under Partners > Clients (platforms) or Sellers (marketplaces).
Alternative: plain authorization URL (not recommended)
If you cannot use Client Links, build the authorization URL yourself with the same parameters and skip Step 1. You lose the pre-fill option and co-branding, which means more typing, more potential errors and more drop-off, so we recommend using this approach solely for quick tests or edge cases.
Mollie still hosts onboarding and verification in both paths.
Configure profiles (SaaS platforms only)
Profiles represent your merchant's storefronts. All payments are associated with a specific profile, so you need to determine which profile to use before creating payments on their behalf.
- For existing Mollie merchants, use List profiles to retrieve their profiles and prompt them to select one.
- To create a new profile, call Create profile.
- Manage payment methods per profile via Enable method and Disable method.
Always include the profileId when creating payments on behalf of a connected merchant.
If most of your merchants are new to Mollie, we recommend skipping the "list existing profiles" step entirely and immediately create a new profile on their behalf, then enabling all relevant payment methods. This way both the profile and payment method configuration are submitted for review at the same time, reducing back-and-forth during onboarding.
Marketplace platforms own payments on their own account and do not configure profiles for connected sellers.
Monitor capabilities
Use the Capabilities API (currently beta) to check whether a connected account can accept payments and receive settlements. Poll it periodically and surface the account's readiness to your users.
Connect exposes two capabilities at the organization level: payments and settlements. Each has a status of unrequested, pending, enabled, or disabled. A merchant can have payments enabled while settlements is still pending, so check each capability rather than treating onboarding as all or nothing. Per-capability requirements are not published here and can change.
The older onboarding status endpoint is being replaced by newer, more capable endpoints (business information, ultimate beneficial owner, and related) that will sit under an Onboarding navigation. Reliance and licensed partners submit KYB data through these endpoints.
| Capability | status values | When enabled |
|---|---|---|
payments | unrequested, pending, enabled, disabled | Merchant can accept payments |
settlements | unrequested, pending, enabled, disabled | Merchant can receive bank settlements |
Manage merchants in the dashboard
Your Mollie partner dashboard gives you a centralized view of all connected accounts and the tools to monitor their onboarding progress.
Clients overview
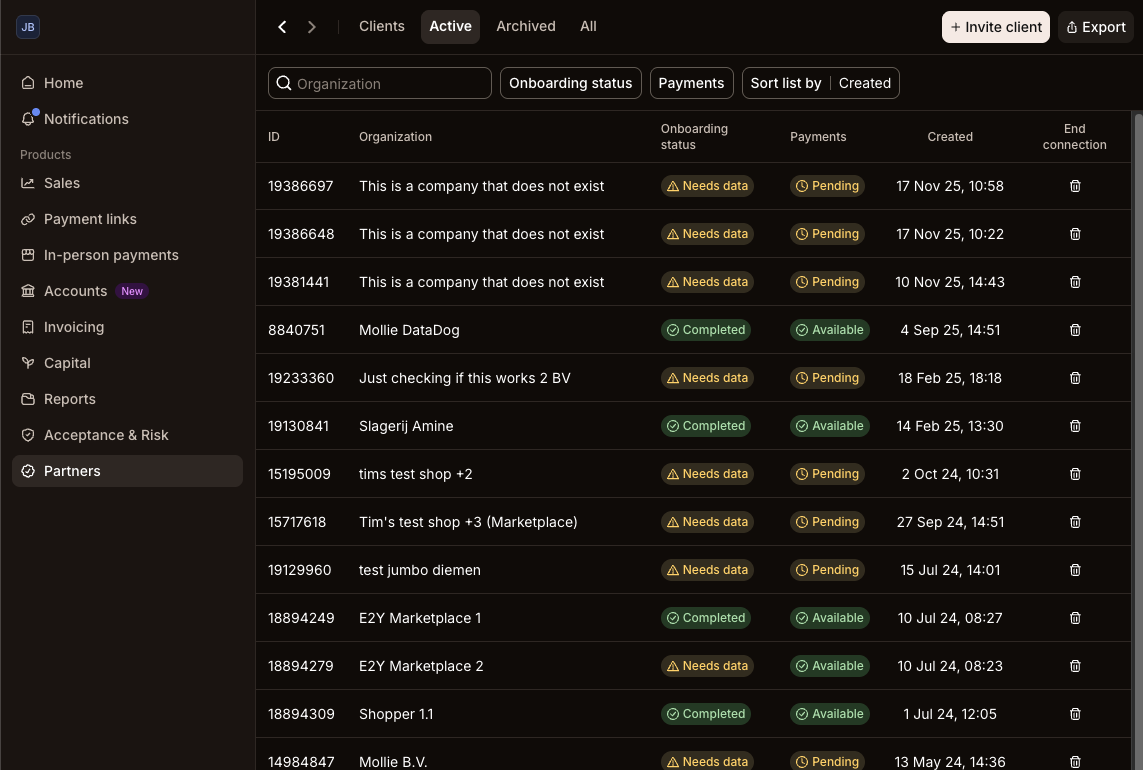
The Partners > Clients page lists all connected and in-progress accounts.
You can search by organization name, organization ID or display name and filter by onboarding status or payment availability.
Each row shows:
- Onboarding status:
Needs data, orCompleted - Payments: whether the account can currently accept payments
AvailableorPending) - Created: timestamp showing when the connection was established
Use this view to spot accounts that are stuck in onboarding and may need follow-up.
Client details page
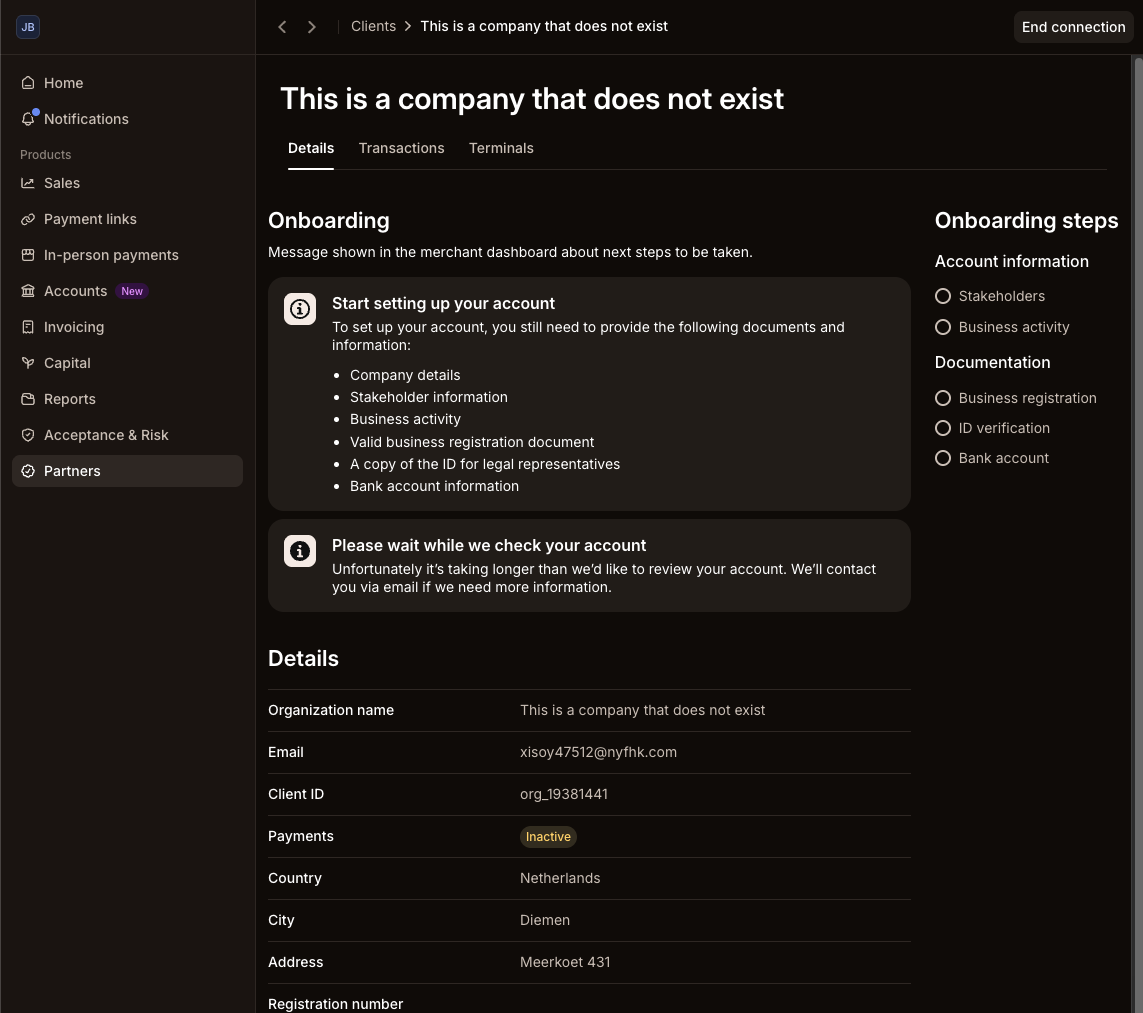
Clicking any client opens the detail page, which has three tabs: Details, Transactions, and Terminals.
The Details tab shows:
-
Onboarding steps: a checklist of what the merchant still needs to complete, grouped by Account information (stakeholders, business activity) and Documentation (business registration, ID verification, bank account). The page also shows the message currently displayed in the merchant's own Mollie dashboard, so you can see exactly what they are being asked to do.
-
Organization details: name, email, Client ID, payment status, country, address, and registration number.
-
Profiles and payment methods: the profiles configured on the account and which payment methods are enabled per profile.
Accessing merchant data in the dashboard requires the
organizations.readandonboarding.readpermission scopes.
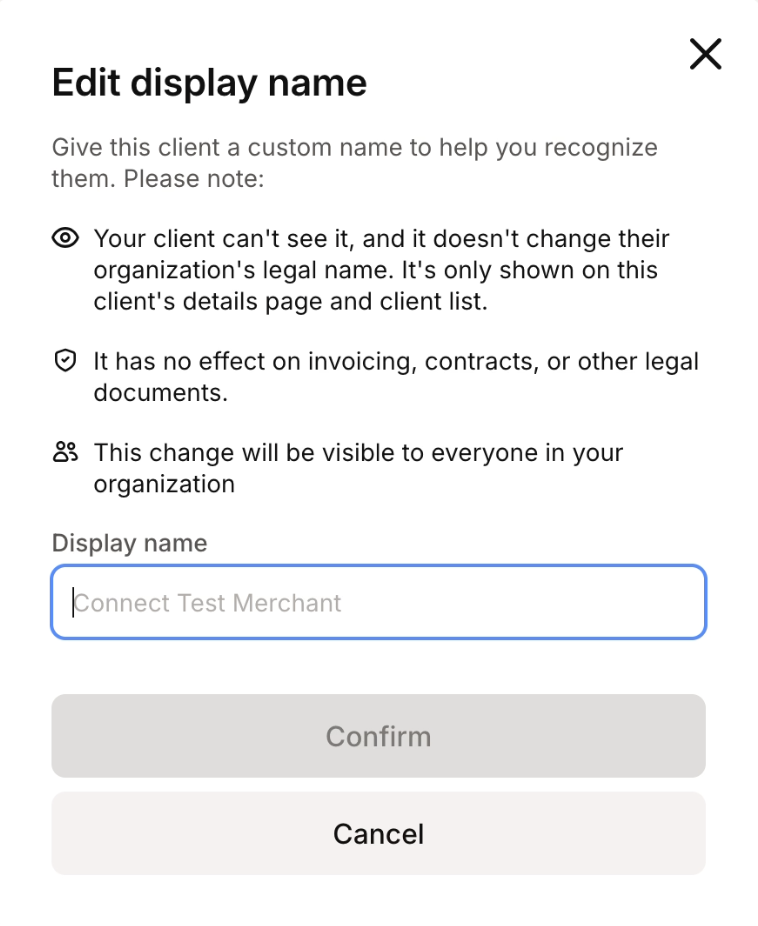
You can also customize the Display Name for a client to help search and recognize clients in the client list.
This is visible to everyone in your organization but will not be visible to your client and has no effect on invoicing, contracts or any other legal documents.
To customize the Display name:
- Go to Partners > Clients page
- Select the Organization you want to change the name for
- Click Edit display name in the right upper corner
- Enter the new name and click Confirm
Updated 4 days ago