Shopware 6 Plugin: Manage orders
Ship orders
Mark physical, digital and service orders as shipped to capture payment. You can use Mollie Plugin for Shopware 6 or Shopware 6's own shipping manager to mark orders as shipped. Once orders have been marked as shipped, Mollie automatically captures the authorized amount.
NoteYou can only mark an order as shipped if the customer pays for it with a payment method that uses the Orders API.
Klarna payment methods require you to mark orders as shipped before capturing payment.
Manually mark orders as shipped
- Log in to Shopware 6.
- Go to Orders > Overview.
- Select the context menu button (three dots) on the order that you want to mark as shipped and select View.
- Go to Items.
- Select the expander icon on the Mollie actions button and select Ship through Mollie.
- Select the items that you want to ship.
- Optional: Change the quantity of each item that you want to ship.
- Optional: To attach tracking details to the Mollie shipment, select the Add tracking info for this shipment toggle. If available, the tracking code is pre-filled. If not, fill one in manually.
- Select Ship.
Automatically mark orders as shipped
Note
- You can automatically mark orders as
shippedusing the Shopware 6 Flow Builder.- You can only mark whole orders as shipped.
- If available, the tracking code is automatically included in the shipping information.
- Log in to Shopware 6.
- Go to Extensions > My extensions.
- Open the Mollie Payments context menu (three dots), and select Configure.
- Go to the Order management section and switch on the Automatic shipping toggle.
- Save the changes.
Give refunds
Mollie Plugin for Shopware 6 includes a refund manager, which you can use to give customers a full or partial refund for their orders.
What you need to do in advance
Refund a specific amount
You can refund all or part of the order amount.
- Log in to Shopware 6.
- Go to Orders > Overview.
- Select the context menu button of the order that you want to refund and then select View.
- Go to Items.
- Open order details > Mollie > Open refund manager.
- Scroll to the refund calculation and enter the amount.
- Optional: Enter a description for the official account sent to your customers.
- Optional: Enter a description for your own internal records. The description will only be visible to your customers on their bank statement.
- Optional: If the refund manager requires a verification step, select the I have verified the total refund amount and the configured quantities to refund and restock checkbox.
- Choose the appropriate refund type:
- Partial refund: Enter an amount in the field, and select Refund.
- Full refund: Select Full refund.
Refund items
If you want to be able to refund individual order items, make sure that the payment methods you offer use the Orders API.
- Log in to Shopware 6.
- Go to Orders > Overview.
- Select the context menu button of the order that you want to refund and then select View.
- Go to Items.
- Open order details > Mollie > Open refund manager.
- In the table containing the order's line items, enter the quantity of items that you want to refund in the first Refund column.
- Optional: To refund a partial amount for each line item, enter the amounts in the second Refund column.
- Optional: If the automatic restock calculation settingin the Refund Manager is switched off, you can enter the amount to restock in the Reset stock column.
- Scroll to the refund calculation.
- Optional: Enter a description for the official account sent to your customers.
- Optional: Enter a description for your own internal records. The description will only be visible to your customers on their bank statement.
- Optional: If the refund manager requires a verification step, select the I have verified the total refund amount and the configured quantities to refund and restock checkbox.
- Select Refund.
Refund vouchers
You can only refund orders that were partially paid with a voucher, because voucher issuers don't support refunds. You must refund those orders by amount rather than by item, and the amount depends on what was paid with a different payment method.
- Log in to Shopware 6.
- Go to Orders > Overview.
- Select the context menu button of the order that you want to refund and then select View.
- Go to Items.
- Open order details > Mollie > Open refund manager.
- Scroll to the refund calculation. The Refundable amount field shows the maximum amount that you can refund your customer.
- Optional: Enter a description for the official account sent to your customers.
- Optional: Enter a description for your own internal records. The description will only be visible to your customers on their bank statement.
- Optional: If the refund manager requires a verification step, select the I have verified the total refund amount and the configured quantities to refund and restock checkbox.
- Select Refund.
Refund subscription orders
You can only refund subscription orders based on an amount.
- To issue a full refund for a subscription order, issue a Full refund.
- To issue a partial refund for a subscription order, follow the steps in Refund a specific amount.
Understand statuses
Mollie statuses and Shopware 6 statuses
After an order has been submitted, Mollie keeps track of a payment's status and sends it to Shopware 6. Because Mollie has its own standard set of payment statuses, which may not exactly match with Shopware 6's, the plugin has to translate Mollie status names into the equivalent Shopware 6 status names. That is why the payment status that you see in your Mollie Web app may differ from the status in Shopware 6.
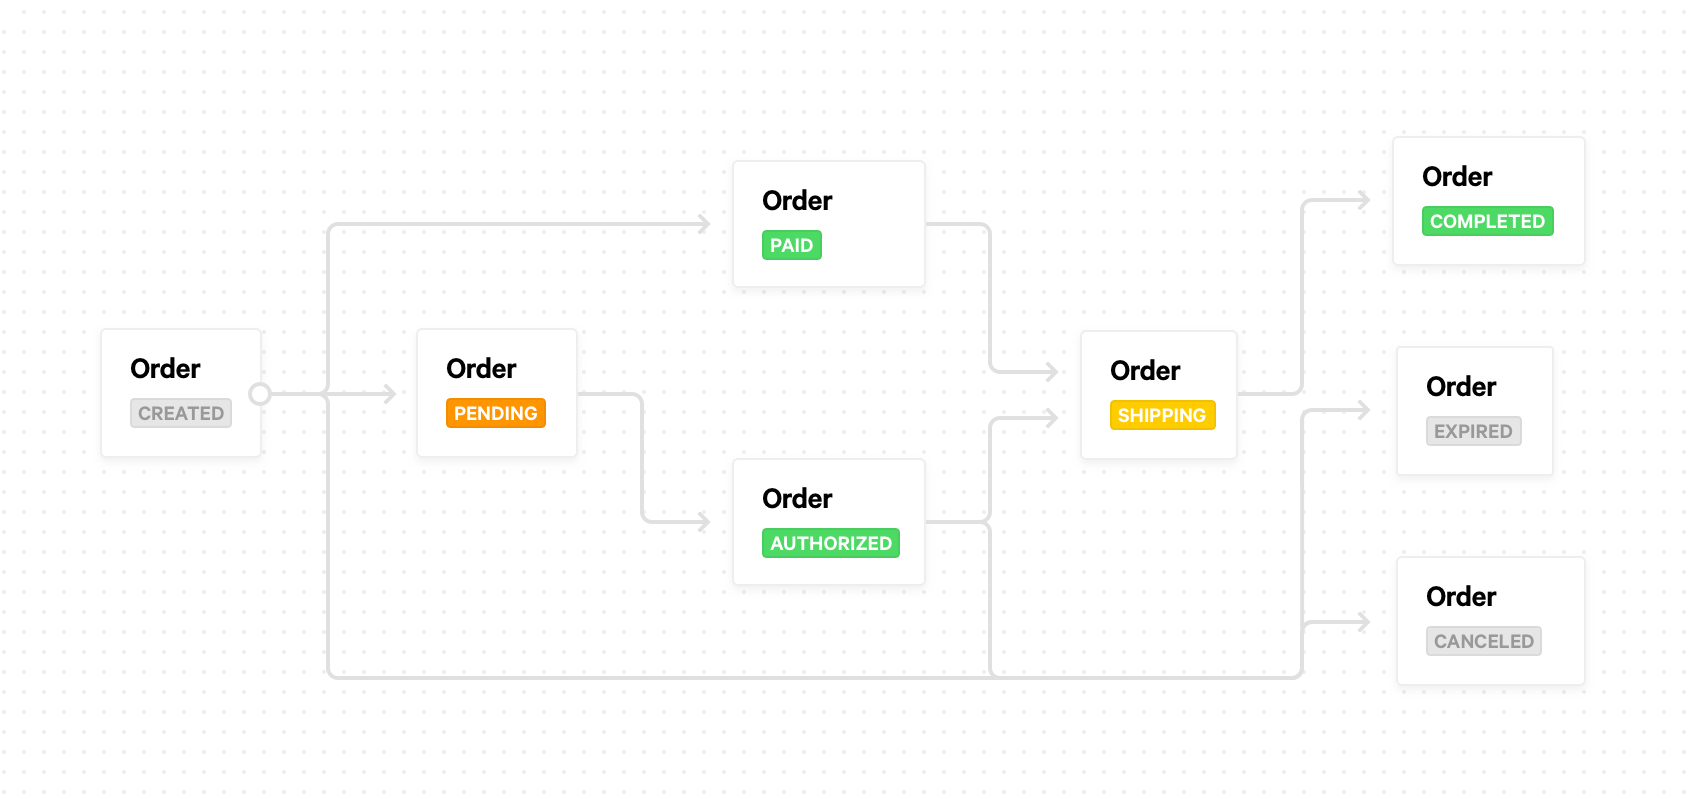
Mollie status flow
Two Mollie status flows are possible, depending on the API method used for a payment. When configuring a payment method you can choose between the Payments API, which handles payment statuses, or the Orders API, which handles order statuses.
Figure 1. Payment status flow
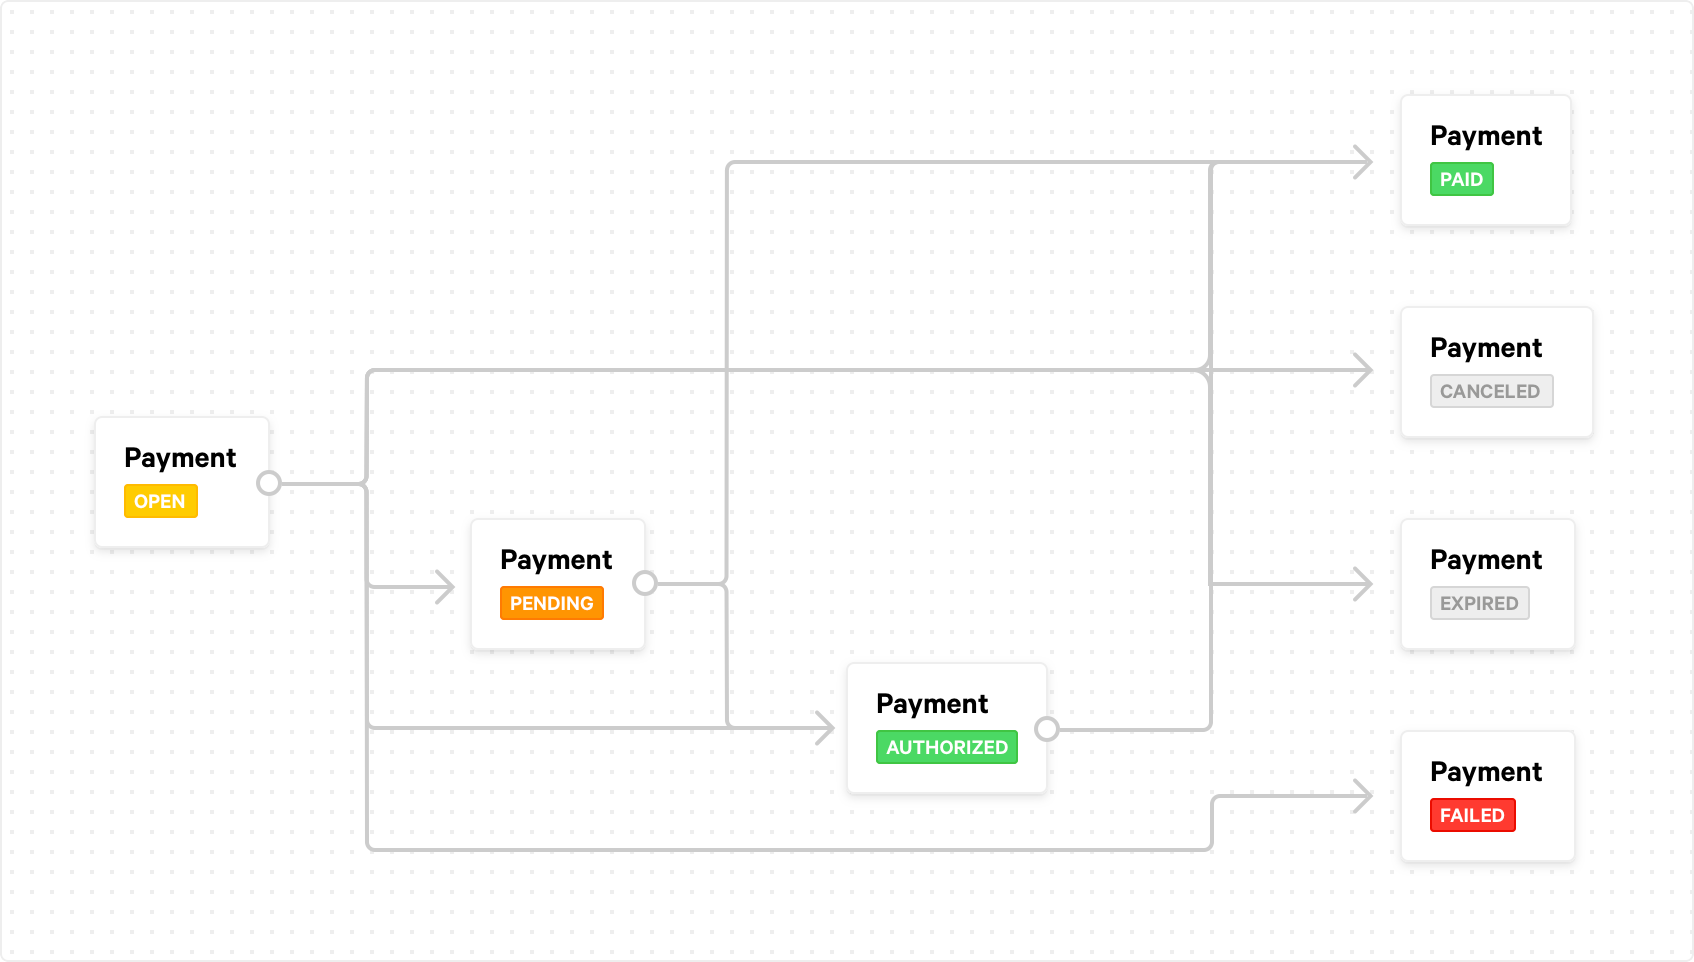
Figure 2. Order status flow
NoteMollie also has statuses for payment processing steps after a payment is completed, for example, the
refundedstatus.
Mollie - Shopware 6 payment status mapping
Mollie-Shopware 6 status mappings are pre-configured and you cannot change them.
| Shopware 6 payment status | Mollie payment status |
|---|---|
| Open | Open |
| Delayed | Pending |
| Authorized | Authorized |
| Paid | Paid |
| Paid | Completed |
| Canceled | Canceled |
| Canceled | Failed |
| Canceled | Expired |
| Re-crediting | Refunded |
| Re-crediting | Refunded (Partially) |
Mollie - Shopware 6 order status mapping
Automatically transition orders to your preferred Shopware 6 order status based on the Mollie payment status:
- Log in to Shopware 6.
- Go to Extensions > My extensions.
- Open the Mollie Payments context menu (three dots), and select Configure.
- Scroll down to the Order state automation panel and open a transaction status drop-down menu.
- Select the Shopware 6 state that corresponds to the Mollie order status (e.g., "Order state with a paid transaction" maps to "Paid" status).
- Save the changes.
Lock the final order status
When order state updates are triggered by shipping plugins or the flow builder, Shopware 6 may send a shipment notification to Mollie, which in turn notifies Shopware 6 that the order is now marked as paid. As a result, Shopware 6 changes the order's status to the mapped value, for example in progress.
If you want to prevent this, lock the final order state, which causes Mollie to ignore the shipment notification from Shopware 6.
NoteLocking the final order state makes Mollie ignore all Shopware 6 status updates, except refunds and chargebacks.
- Log in to Shopware 6.
- Go to Extensions > My extensions.
- Open the Mollie Payments context menu (three dots), and select Configure.
- Go to the Order state automation section.
- Select the order state that you want as the final order state, e.g., Complete, from the Final order state drop-down menu.
- Save the changes.
Updated 4 months ago