Magento 2: Set up your checkout
Add payment methods
Enhance your customers' payment experience by offering them a variety of payment methods.
What you need to do in advance
- Ensure that the payment methods that you want to offer are activated in the Web app.
- If you have a multiple websites or stores, keep in mind that configuration settings apply to all levels of the hierarchy by default. Ensure that you understand how sites, stores, and view scopes work↗, and change the scope↗ if needed.
ImportantSome payment methods require Mollie's approval before they're available in your Mollie Web app. If your account has been approved but payment methods are still missing from your Web app, contact support.
Add payment methods
To add payment methods to your checkout, follow these steps:
- Log in to Magento 2.
- Go to Stores > Configuration.
- Expand the Mollie section in the left side-bar, and select Payment methods.
- Select the payment method that you want to configure.
- Select Yes from the Enabled drop-down menu.
- Save the changes.
TipTo remove payment methods select No from the Enabled drop-down menu.
Add a default payment method
- Log in to Magento 2.
- Go to Stores > Configuration.
- On the Configuration page, scroll to Mollie , select the arrow, and then General.
- In the Settings section, select the payment method from the Default selected method drop-down menu.
- Save the changes.
Use the Payment Link to create an Admin payment
Enable and Configure the Payment Link / Admin Payment
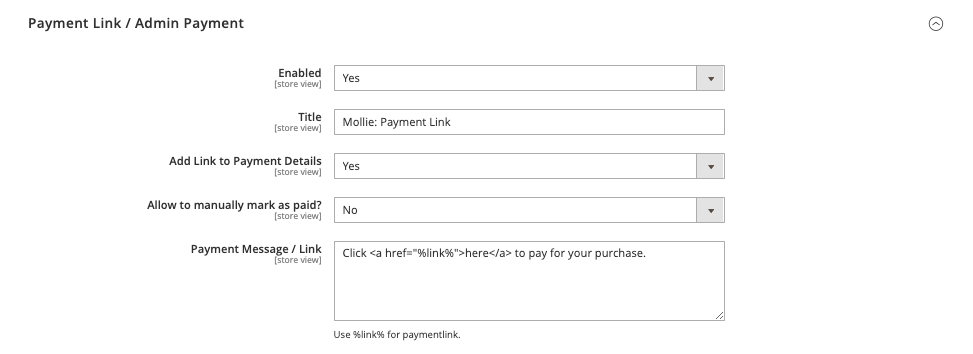
This method can be configured as any other payment method by navigating to Configuration > Mollie > Payment methods. Enable the payment method Payment Link / Admin Payment to make the configuration visible.
Within the configuration, there are a few options that differ from the default Mollie payment methods:

Add Link to Payment Details
- If set to yes, the checkout URL will be automatically added to the order e-mail.
- If set to no, no link will be added and you can copy the URL from the order in the back-end.
Allow to manually mark as paid?
- If set to yes, there will be a "Mark as paid" button visible in the order, which can be used for example when the payment is done in the physical store.
- If set to no, this button will not be available in the order within Magento.
Payment Message / Link
You can add a message as a payment method including the link using %link% to get the payment link.
For example: Click <a href="%link%">here</a> to pay for your purchase.
Language of the Mollie Payment Screen
The Language of the landings page at Mollie can be configured using the Language Payment Page configuration option under the advanced settings within the Mollie configuration. Here you can use the "use locale" option to always use the store_locale.
Using the Payment Link / Admin Payment
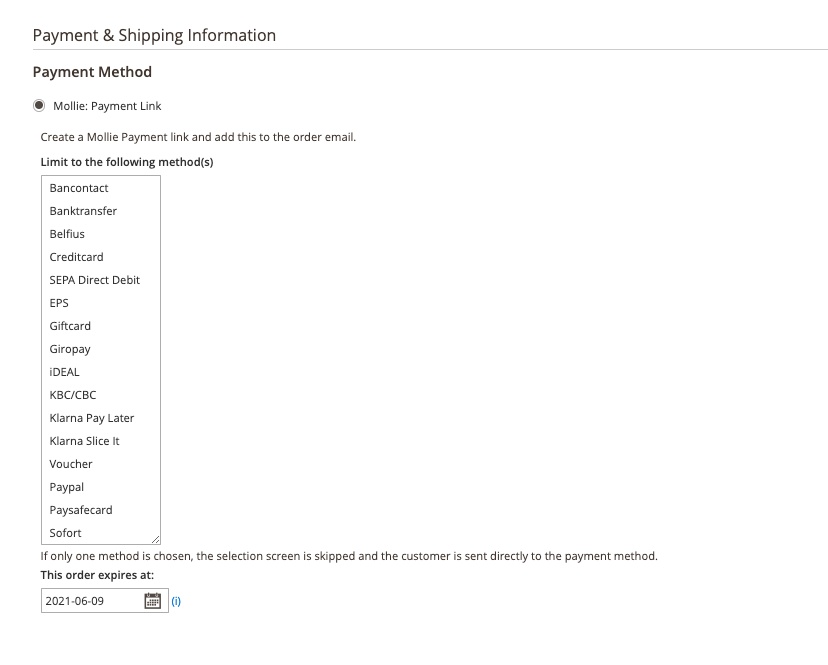
With this feature, you make it possible to create a Payment link on order creation which can be added to the order e-mail that's sent to the client. Using the multi-select, you can select the payments that you want to allow during the payment. If only one method is chosen, the selection screen is skipped and the customer is sent directly to the payment method.

You can also set an expiration time for the order before the order will be canceled. It is not possible to use Klarna Slice it or Klarna Pay later as a method when your expiry date is more than 28 days (unless another maximum is agreed between the merchant and Klarna).
When is the payment created in the Mollie Web app?
Normally, whenever an order is placed with a Mollie payment method, the transaction is created in the Mollie Web app. However, with the payment link method this isn’t the case. This creation step is postponed until the customer clicks on the payment link. Then the transaction is created, and a transaction ID is assigned.
Customize your checkout
Improve the user experience of your Magento 2 checkout and maintain its brand consistency by customizing the payment method descriptions, logos, and display.
Hide payment method logos
Hide payment method logos and display only payment method names:
- Log in to Magento 2.
- Go to Stores > Configuration.
- Expand the Mollie section in the left sidebar, and select General.
- Expand the Settings section, and in the Show icons drop-down menu, select No.
- Save the changes.
Hide payment methods based on order amount limits
Set an upper order amount limit to encourage the use of other payment methods for larger orders so that you can benefit from lower transaction fees, faster processing times, or enhanced fraud protection. Set a lower limit to hide more expensive payment methods for smaller orders and streamline the checkout process for customers.
- Log in to Magento 2.
- Go to Stores > Configuration.
- Expand the Mollie section in the left side-bar, and select Payment methods.
- Select the payment method that you want to configure.
- Enter the minimum value in the Minimum order total field.
- Enter the maximum value in the Maximum order total field.
- Save the changes.
Hide the payment method issuer list
Hide the issuer list to redirect payment to a third-party checkout (for Gift cards and KBC payment button):
- Log in to Magento 2.
- Go to Stores > Configuration.
- Expand the Mollie section in the left side-bar, and select Payment methods.
- Select the payment method that you want to configure.
- Select Don't show issuer list from the Issuer list style drop-down menu.
- Save the changes.
Change the issuer list style
Optimize the display of issuer lists in your checkout (for Gift cards and KBC payment button):
- Log in to Magento 2.
- Go to Stores > Configuration.
- Expand the Mollie section in the left side-bar, and select Payment methods.
- Select the payment method that you want to configure.
- Select an option from the Issuer list style drop-down menu:
- Save the changes.
| Option | Description |
|---|---|
| Dropdown | Display the list as a drop-down menu. |
| List with images | Display the list with icons. |
| Don't show issuer list | Hide the list. |
Localize your checkout
Localize payment method names and descriptions, the payment methods displayed in each country, and the order in which they are displayed to enhance the user experience.
Change payment method names
Localize payment method names in your checkout to cater to the countries you operate in.
- Log in to Magento 2.
- Go to Stores > Configuration.
- Expand the Mollie section in the left side-bar, and select Payment methods.
- Select the payment method that you want to configure.
- Enter the name of your choice in the Title field.
- Save the changes.
Localize Mollie Checkout
Ensure a seamless customer experience by maintaining language consistency when redirecting from your store checkout to Mollie Checkout.
- Log in to Magento 2.
- Go to Stores > Configuration.
- On the Configuration page, expand the Mollie and select Advanced.
- Go to Triggers and languages.
- Select an option from the Language payment page drop-down menu and save the changes:
| Option | Description |
|---|---|
| Auto-detect | Use the language of the browser's locale. |
| Store locale | Use the language of the locale that is active in the current store |
| [locale] | Use the language of the selected locale. |
Display different payment methods in each country
Display selected payment methods for each country in which you have customers, allowing them to see local payment options when checking out.
- Log in to Magento 2.
- Go to Stores > Configuration.
- Expand the Mollie section in the left side-bar, and select Payment methods.
- Select the payment method that you want to configure.
- Select Specific countries from the Payment from applicable countries drop-down menu.
- Select the billing country, or countries from the Payment from specific countries drop-down menu.
- Save the changes.
Rearrange the payment method display order
Prioritize your customers' preferred payment options by placing them at the top of the list.
- Log in to Magento 2.
- Go to Stores > Configuration.
- Expand the Mollie section in the left side-bar, and select Payment methods.
- Select the payment method that you want to configure.
- To determine the display order of a payment method, enter a number in its Sort Order field. For example, enter '1' for the payment method to appear first in the checkout.
- Assign a number to each enabled payment method.
- Save the changes.
Updated 9 months ago