Implementing OAuth
Mollie Connect is a suite of tools that helps you integrate, accept and route payments for your merchants and sub-merchants. See the full overview for more information.
Most of the functionality of Mollie Connect is facilitated through the use of OAuth app and this guide will explain how you can set it up.
Understanding the OAuth authorization flow
To support OAuth with your app, you must implement the common OAuth authorization flow. The flow starts with a Connect with Mollie button, and if all goes well, at the end of it you will have received an access token. With this token, your app will be able to communicate with the Mollie API on behalf of the user.
The authorization flow looks roughly as follows.
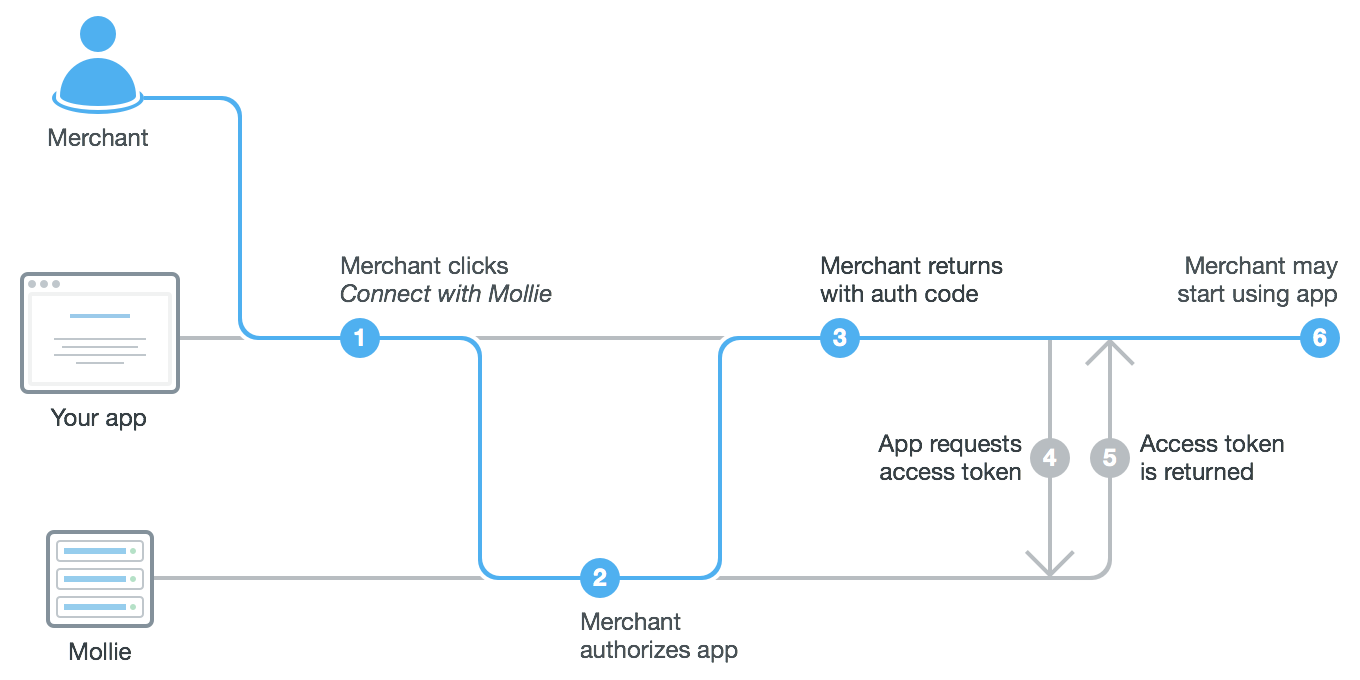
Building an OAuth-compatible app
Next, you will have to build an app that supports the authorization flow detailed above by following our step-by-step guide.
Once your OAuth App is created, you’ll receive two important credentials:
- Client ID – Acts like the username for your app. This is a public identifier used in every OAuth API request to Mollie.
- Client Secret – Functions like a password for your OAuth app and should never be exposed. It’s used to obtain access tokens and verify that your app is legitimate.
For many programming languages, open source packages are available with detailed instructions to help you implement the OAuth flow:
- Simple OAuth2 for Node.js
- The PHP League’s OAuth 2.0 Client for PHP
- Authlib for Python, with support for common web frameworks like Flask and Django
If your application is built with PHP, you can integrate it using the official mollie/oauth2-mollie-php package. The official Python client even supports OAuth out of the box.
Mollie OAuth SDK
Mollie also offers OAuth SDK to simplify the integration:
<?php
// composer require mollie/oauth2-mollie-php

$provider = new \Mollie\OAuth2\Client\Provider\Mollie([
    "clientId" => "app_j9Pakf56Ajta6Y65AkdTtAv",
    "clientSecret" => "S5lTvMDTjl95HGnwYmsszDtbMp8QBE2lLcRJbD7I",
    "redirectUri" => "https://example.org/oauth-redirect",
]);

$authorizationUrl = $provider->getAuthorizationUrl([
    "scope" => [
        \Mollie\OAuth2\Client\Provider\Mollie::SCOPE_ORGANIZATIONS_READ,
        \Mollie\OAuth2\Client\Provider\Mollie::SCOPE_PAYMENTS_READ,
    ],
]);
Once you have an OAuth compatible app running, let’s register your app at Mollie.
Getting a merchant’s consent
When onboarding a customer via OAuth, your application needs permission to access or submit data from their account. This is done by establishing an OAuth connection with a specific scope, that defines what actions your app is allowed to perform.
There is a full list of OAuth permissions available, but there are a few things to take into account:
- The required scope depends on your integration needs
- Security best-practices recommend minimizing the permission set
- If you need more permissions later, the customer has to authorize your App once more
By setting the right scope, you ensure your app has only the access it needs, keeping it secure and efficient.
Connect button
To integrate a Mollie Connect button into your website, you can either design the button in your own style or use the pre-generated code snippet provided below.
 <!-- Mollie Connect Button -->
<style>
  .mollie-button {
    display: inline-flex;
    align-items: center;
    padding: 8px 16px;
    background-color: #fff;
    color: #000;
    border: 1px solid #e0e0e0;
    border-radius: 6px;
    font-family: -apple-system, BlinkMacSystemFont, "Segoe UI", Roboto, Arial, sans-serif;
    font-size: 16px;
    font-weight: 500;
    text-decoration: none;
    cursor: pointer;
    transition: border-color 0.3s ease;
    box-shadow: 0 1px 2px rgba(0, 0, 0, 0.05);
  }
  .mollie-button:hover {
    border-color: #b0b0b0;
  }
  .mollie-logo {
    height: 14px;
    margin-left: 8px;
  }
</style>
<a href="YOUR_MOLLIE_AUTHORIZE_ENDPOINT" class="mollie-button">
  Connect with
  <svg class="mollie-logo" viewBox="0 0 320 94" fill="#000000" xmlns="http://www.w3.org/2000/svg">
    <path fill-rule="evenodd" clip-rule="evenodd" d="M289.3,44.3c6.9,0,13.2,4.5,15.4,11h-30.7C276.1,48.9,282.3,44.3,289.3,44.3z M320,60.9c0-8-3.1-15.6-8.8-21.4 c-5.7-5.8-13.3-9-21.3-9h-0.4c-8.3,0.1-16.2,3.4-22.1,9.3c-5.9,5.9-9.2,13.7-9.3,22c-0.1,8.5,3.2,16.5,9.2,22.6 c6.1,6.1,14.1,9.5,22.6,9.5h0c11.2,0,21.7-6,27.4-15.6l0.7-1.2l-12.6-6.2l-0.6,1c-3.1,5.2-8.6,8.2-14.7,8.2 c-7.7,0-14.4-5.1-16.5-12.5H320V60.9z M241.2,19.8c-5.5,0-9.9-4.4-9.9-9.9c0-5.5,4.4-9.9,9.9-9.9s9.9,4.4,9.9,9.9 C251.2,15.3,246.7,19.8,241.2,19.8z M233.6,92.7h15.2V31.8h-15.2V92.7z M204.5,1.3h15.2v91.5h-15.2V1.3z M175.4,92.7h15.2V1.3h-15.2 V92.7z M135.3,79c-9.2,0-16.8-7.5-16.8-16.7c0-9.2,7.5-16.7,16.8-16.7s16.8,7.5,16.8,16.7C152.1,71.5,144.6,79,135.3,79z M135.3,30.5c-17.6,0-31.8,14.2-31.8,31.7S117.8,94,135.3,94c17.5,0,31.8-14.2,31.8-31.7S152.9,30.5,135.3,30.5z M70.4,30.6 c-0.8-0.1-1.6-0.1-2.4-0.1c-7.7,0-15,3.1-20.2,8.7c-5.2-5.5-12.5-8.7-20.1-8.7C12.4,30.5,0,42.9,0,58v34.7h14.9V58.5 c0-6.3,5.2-12.1,11.3-12.7c0.4,0,0.9-0.1,1.3-0.1c6.9,0,12.5,5.6,12.5,12.5v34.6h15.2V58.4c0-6.3,5.2-12.1,11.3-12.7 c0.4,0,0.9-0.1,1.3-0.1c6.9,0,12.5,5.6,12.6,12.4v34.7h15.2V58.5c0-7-2.6-13.6-7.2-18.8C83.7,34.4,77.3,31.2,70.4,30.6z"/>
  </svg>
</a>
Authorize
GET https://my.mollie.com/oauth2/authorize
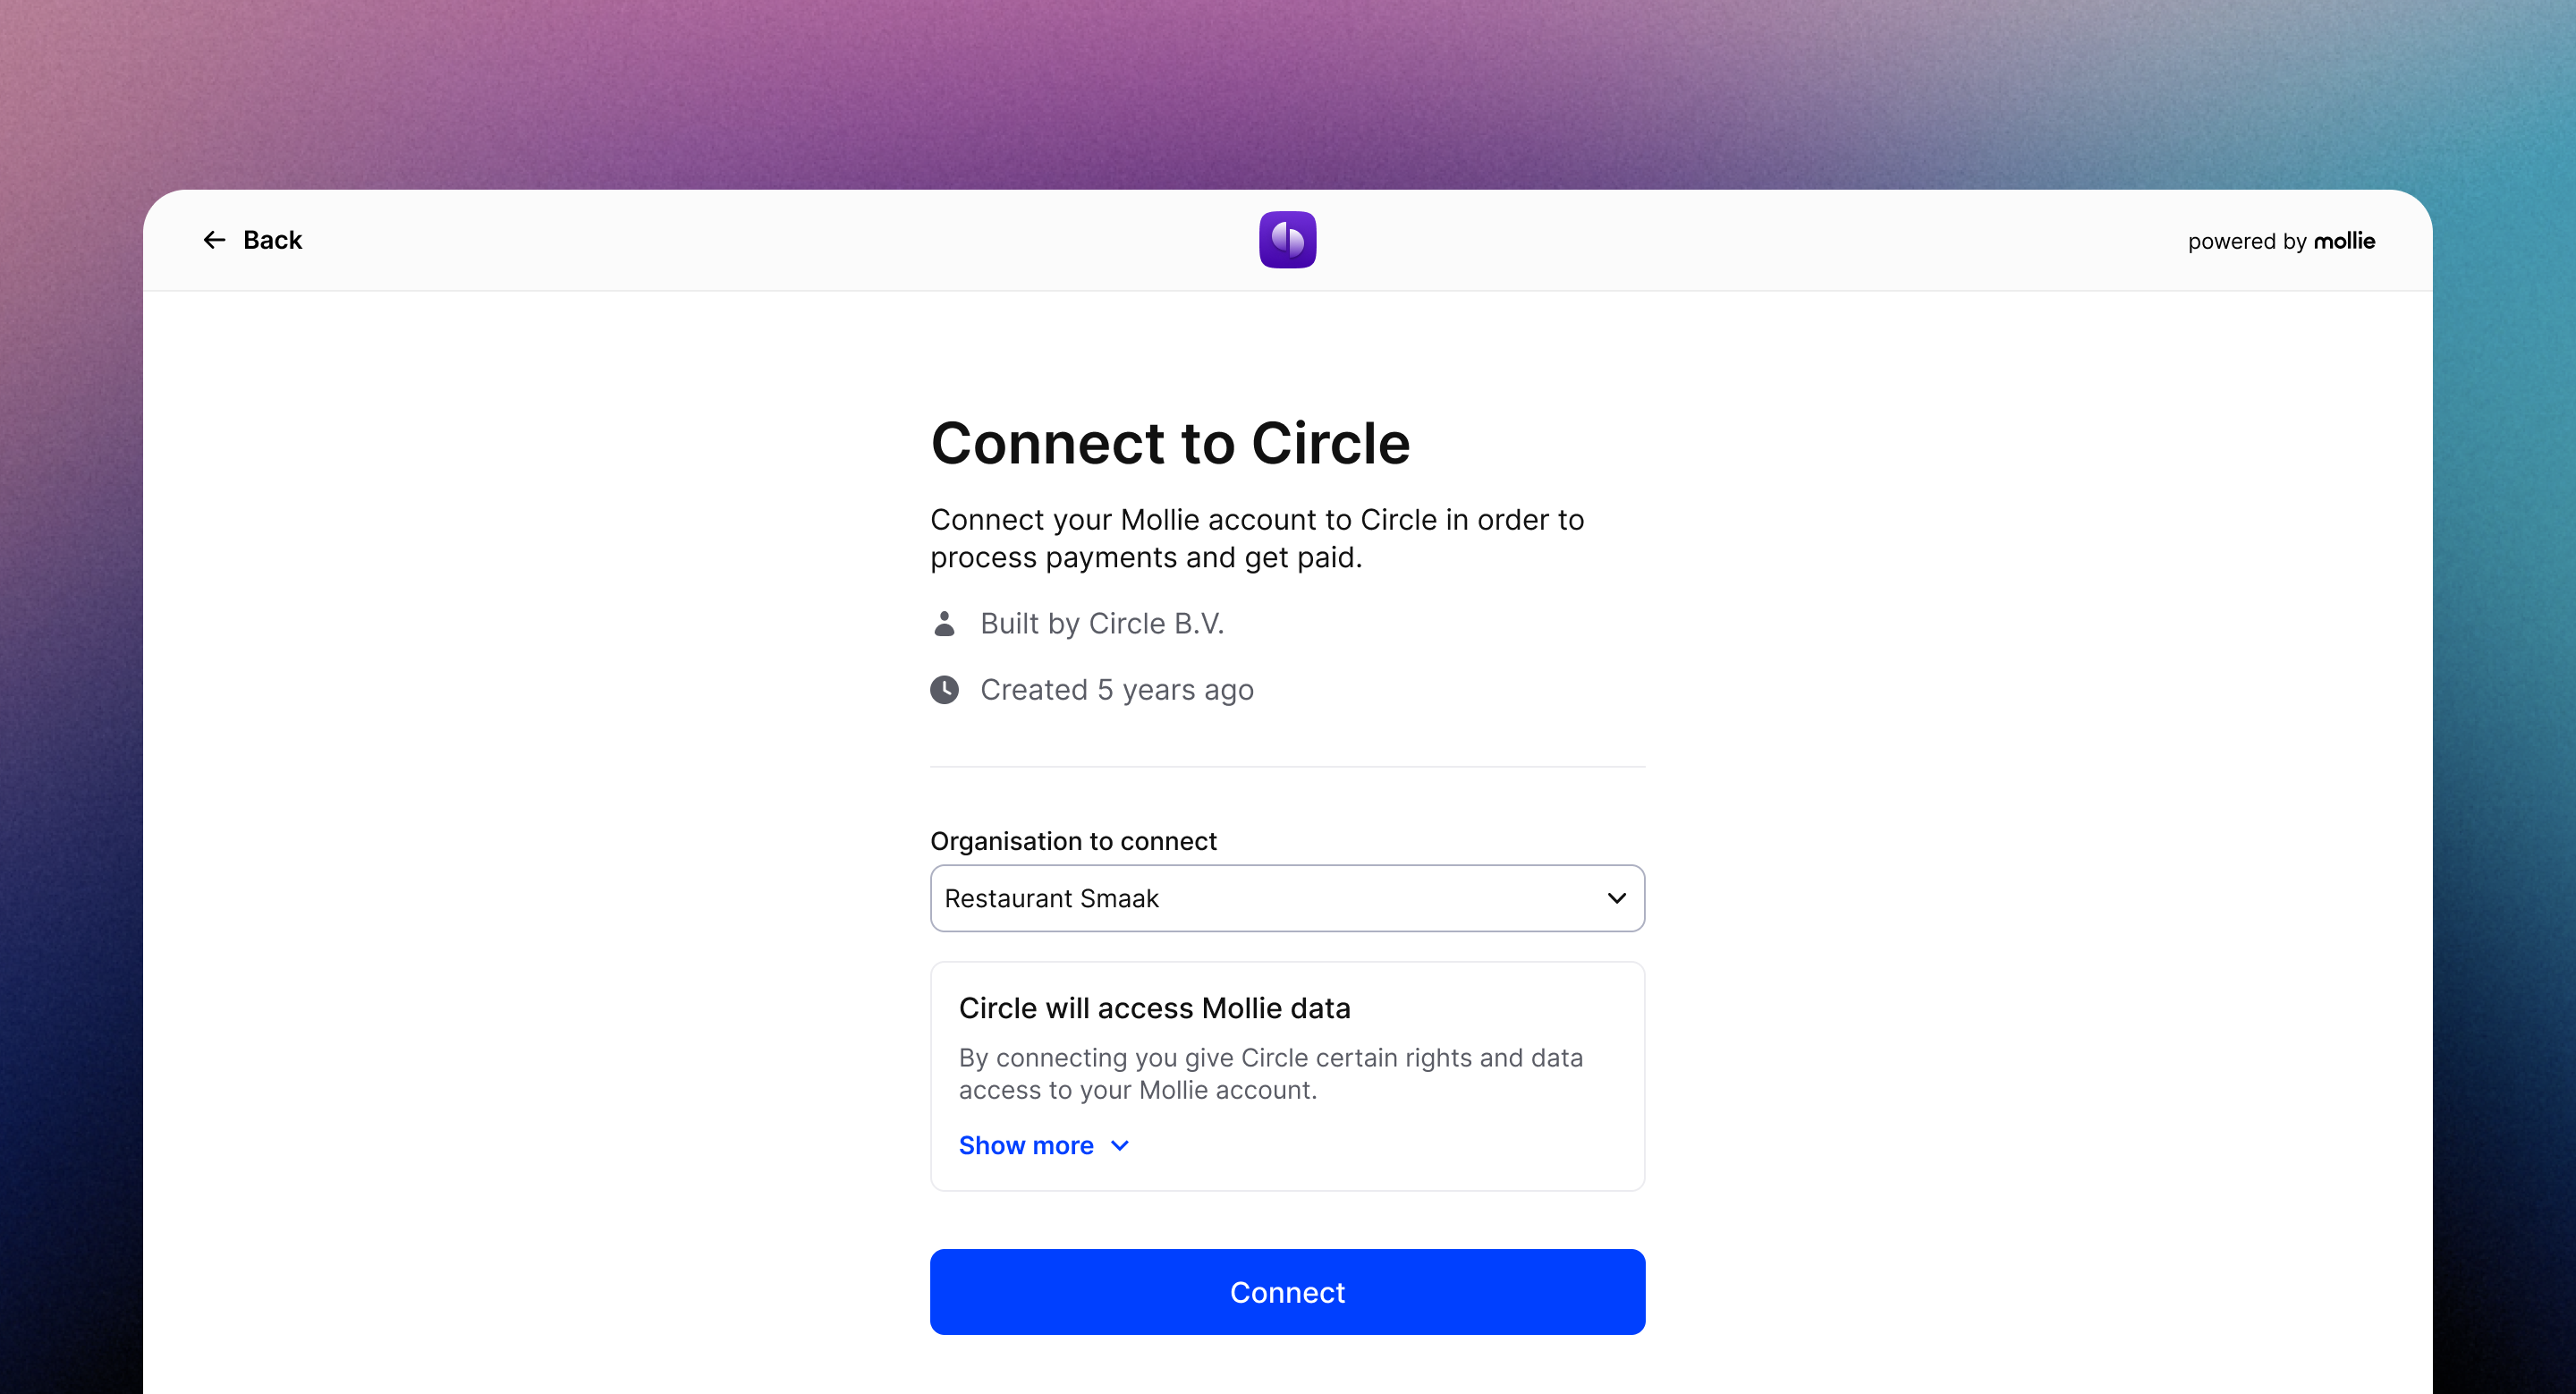
Authorize is a hosted OAuth authorization screen that follows the OAuth 2 standard.
You can use it to gather consent from your merchants, allowing you to connect multiple Mollie accounts (your customers) to your application and giving you access to perform actions on their behalf.
When you send a merchant to the authorization screen, Mollie will tell the merchant what data your app has requested access to and request the merchant to confirm the authorization. An example authorization is shown below:
See the full example of the OAuth flow in our Connect for Platforms: Setting up OAuth article.
URL Query parameters
First, construct the authorization URL using the parameters below:
client_id string (required)
client_id string (required)The client ID you received when you registered your OAuth app. The ID starts with
app_.
For example:app_j9Pakf56Ajta6Y65AkdTtAv.
redirect_uri string
redirect_uri stringThe URL the merchant is sent back to once the request has been authorized. If given, it must match the URL you set when registering your app.
state string (required)
state string (required)A random string generated by your app to prevent CSRF attacks. This will be reflected in the
statequery parameter when the user returns to theredirect_uriafter authorizing your app.
scope string (required)
scope string (required)A space-separated list of permissions ('scopes') your app requires. See the permissions list for more information about the available scopes.
Example:
organizations.read profiles.read payments.read payments.write
response_type string (required)
response_type string (required)The OAuth response type. We only support
coderesponses.Possible values:
code
approval_prompt string
approval_prompt stringCan be set to
forceto force showing the consent screen to the merchant, even when it is not necessary. If you force an approval prompt and the user creates a new authorization, previously active authorizations will be revoked.Possible values:
autoforce(default:auto)
locale string
locale stringPreset the language to be used for the login screen, if applicable. For the consent screen, the preferred language of the logged in merchant will be used and this parameter is ignored.
When this parameter is omitted, the browser language will be used instead.
Possible values:
en_USnl_NLnl_BEfr_FRfr_BEde_DEes_ESit_IT
landing_page string
landing_page stringSpecify if Mollie should show the login or the signup page, when the merchant is not logged in at Mollie.
Possible values:
loginsignup(default:login)
After the redirect, the merchant is asked to log in (if they are not logged in yet) and to grant your app permissions to perform specified actions on their behalf.
Query response
At the end of the flow, Mollie redirects the merchant to the redirect URL you specified. The following parameters are included in the redirect URL:
code
codeIf authorization succeeded, a code will be attached to the redirect URL. You can use this code to retrieve an access token from the Generate tokens endpoint.
state
stateThe state string you attached to the URL will be sent back to you. Please verify it to prevent CSRF attacks.
error
errorIf the authorization failed or your URL was invalid, the merchant will be redirected back to you with an error code.
For example:access_denied
error_description
error_descriptionIf an error occurred, this field will also be present with a description of the error.
For example:The user denied access to your application
Working with access tokens
The merchant will be redirected back to your app, along with an auth code. With the auth code, you can retrieve an access token using default OAuth library functionality.
Note access tokens are time-limited — you need to refresh them periodically using the refresh token. The time limits are listed below.
| Tokens | Limit |
|---|---|
| Auth code | 30 seconds |
| Access token | 1 hour |
| Refresh token | Does not expire automatically |
Once you have the access token, use the Get current organization to see which organization is authenticated to your app. This endpoint also allows you to retrieve the merchant’s preferred locale. It is recommended to switch your app’s locale to the merchant’s locale after the OAuth flow.
Using the access token on the Mollie API, your app may now access the merchant’s account data, allowing the merchant to start using your app.
Updated 4 months ago