Accepting payments in your app
Accepting payments within your mobile app can improve conversion of orders from mobile devices. In this guide we will show you a basic example of integrating Mollie Payments in your iOS or Android app.
The code examples provided here are for illustrative purposes only and Mollie does not offer support on them.
Keep the guidelines of the platform you are developing on in mind
Every platform has its own guidelines for accepting or rejecting apps in the App Store or Marketplace. See App store rules and regulations for an in depth review.
Step 1: Create a Payment-creation script on your server
Storing API keys in your app is insecure. Hence, you need to create a script on your server what you app can call to create the payment for the app. The task of this script is to ensure that the Mollie APIs are called the way you want.
In particular, do not pass the amount from the app to your script but use your own business rules in the script to prevent users of your app from messing with your payments. Remember that the app is installed on a device outside of your control and thus untrusted.
You will need an API-key for this what you can find in your Web app. You will find examples in other languages in the Create payment documentation.
<?php

// You have validated you are communicating with a trusted installation of your app.

$mollie = new \Mollie\Api\MollieApiClient();
$mollie->setApiKey("live_dHar4XY7LxsDOtmnkVtjNVWXLSlXsM");
$payment = $mollie->payments->create([
      "amount" => [
            "currency" => "EUR",
            "value" => "10.00",
      ],
      "description" => "Order 12345",
      "redirectUrl" => "mollie-app://payment-return",
      "webhookUrl" => "https://webshop.example.org/payments/webhook/",
      "metadata" => [
            "order_id" => "12345",
      ],
]);

return $payment->getCheckoutUrl();
Ensure that this file can only be called by genuine installations of your own app.
Step 2: Configure your app to accept the Redirect URL
We will be using a custom URL scheme to ensure your customer is redirected back to the app after the payment. Configure iOS or Android to link your URL scheme with your app.
iOS
Go to your Info.plist file. Right click any blank area and select Add Row to create a new key.
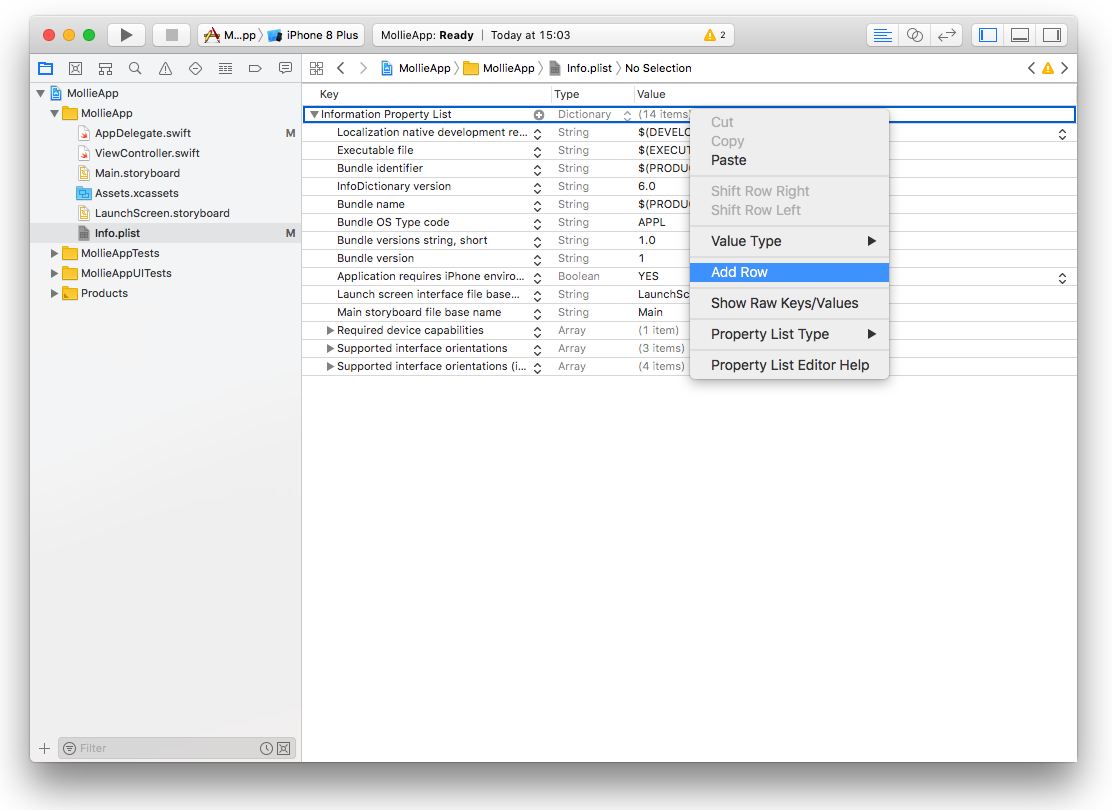
You will be prompted to select a key from a drop-down menu. Scroll to the bottom and select URL types. This creates an array item. You can further click the disclosure icon to expand it and you need to select Item 0. Expand that row as well and you should see URL identifier. Double-click the value field and fill in your identifier. Most of the time will this be the same as your bundle ID, e.g. com.mollie.MollieApp. Click on the plus-button next to Item 0 and choose URL Schemes from the drop-down menu. Expand the URL Schemes row and another Item 0 will show up. Type in the value-field the scheme you want to handle, in our case mollie-app. Make sure to pick a unique scheme.

Android
Open your AndroidManifest.xml file. Decide for what activity you want to support the URL scheme and add the following code inside your <activity> object. Replace android:scheme with your URL scheme and android:host with the command, in our example payment-return.
<intent-filter>
      <data
          android:host="payment-return"
          android:scheme="mollie-app" />
      <action android:name="android.intent.action.VIEW" />
      <category android:name="android.intent.category.DEFAULT" />
      <category android:name="android.intent.category.BROWSABLE" />
  </intent-filter>
Step 3: Call your server and open the Checkout URL
To initiate a payment from your app you need to call the file you have created in step 1 and open the browser with the Checkout URL you will receive. Do this in the native browser of the device and not in an in-app browser view since the operating systems will reject opening the bank apps from these views. If the method supports a mobileAppCheckout URL, use that URL as redirect instead of the regular checkout URL. This will open the banking app directly from your app without opening the browser. This will improve the flow for your consumer.
ImportantNever send an amount to your server for creating a payment to prevent price changes between the payment and the actual price the customer needs to pay.
iOS
func startPayment(order: Order) {
      let parameters = ["orderId": order.id]
      let url        = URL(string: "https://www.thisismylink.com/api/create-payment")!
      let session    = URLSession.shared

      var request        = URLRequest(url: url)
      request.httpMethod = "POST"

      do {
            request.httpBody = try JSONSerialization.data(withJSONObject: parameters, options: .prettyPrinted)
      } catch let error {
            print(error.localizedDescription)
      }

      let task = session.dataTask(with: request as URLRequest, completionHandler: { data, response, error in

            guard error == nil else {
                  return
            }

            guard let data = data else {
                  return
            }

            do {
                  UIApplication.shared.open(NSURL(string: response)! as URL)
            } catch let error {
                  print(error.localizedDescription)
            }
      })
      task.resume()
}
Android
We use the OkHttp library in this example. Therefore, add the following line to your Project’s build.gradle file.
compile 'com.squareup.okhttp3:okhttp:3.5.0'private void startPayment(Order order) {
OkHttpClient client = new OkHttpClient();
RequestBody requestBody = new MultipartBody.Builder()
.setType(MultipartBody.FORM)
.addFormDataPart("orderId", order.getId())
.build();
Request request = new Request.Builder()
.url("https://www.thisismylink.com/api/create-payment")
.post(requestBody)
.build();
try {
response = client.newCall(request).execute();
} catch (IOException e) {
e.printStackTrace();
}
if (response == null || !response.isSuccessful()) {
Log.w("Create Payment", "HTTPS-call failed");
} else {
Intent browserIntent = new Intent(Intent.ACTION_VIEW, Uri.parse(response.body().string()));
startActivity(browserIntent);
}
}private fun startPayment(order: Order) {
OkHttpClient client = new OkHttpClient();
RequestBody requestBody = new MultipartBody.Builder()
.setType(MultipartBody.FORM)
.addFormDataPart("orderId", order.id)
.build();
Request request = new Request.Builder()
.url("https://www.thisismylink.com/api/create-payment")
.post(requestBody)
.build();
try {
response = client.newCall(request).execute();
} catch (e: IOException) {
e.printStackTrace();
}
if (response === null || !response.isSuccessful()) {
Log.w("Create Payment", "HTTPS-call failed");
} else {
val browserIntent = Intent(android.content.Intent.ACTION_VIEW)
browserIntent.data = Uri.parse(response.body().string())
startActivity(browserIntent);
}
}Step 4: Handle the redirect
We return the customer back to your app after the payment is paid or canceled. You should tell the App what to do with this request.
iOS
Open your AppDelegate.swift file and add the application (_:open:options) method. Split out the host into an array so you can access the data that we return. Your method should return true to let the device know that you can handle the request.
func application(_ app: UIApplication, open url: URL, options: [UIApplicationOpenURLOptionsKey : Any] = [:]) -> Bool {
  if (url.host! == "payment-return") {
      let queryItems = URLComponents(url: url, resolvingAgainstBaseURL: false)?.queryItems
      let paymentId = queryItems?.filter({$0.name == "id"}).first

      // Optional: Do stuff with the payment ID

      return true;
  }

  return false;
}
Android
Open the class that you have specified in your AndroidManifest.xml as handler for the URL scheme. And should add the handling code in the onCreate method.### Java
public void onCreate(Bundle savedInstanceState)
{
      super.onCreate(savedInstanceState);

      //...

      Intent intent = getIntent();
      if (Intent.ACTION_VIEW.equals(intent.getAction())) {
            Uri uri = intent.getData();
            String paymentId = uri.getQueryParameter("id");

            // Optional: Do stuff with the payment ID
      }
}
override fun onCreate(savedInstanceState: Bundle){
super.onCreate(saveInstanceState)
// ...
val action: String? = intent?.action
if (action === android.content.Intent.ACTION_VIEW) {
val data: Uri? = intent?.data
val paymentId: String? = data.getQueryParameter("id")
// Optional: Do stuff with the payment ID
}
}Step 5: Share the status of the payment with your app
Since the API-key is not included in your app, you can not request the status of the payment directly from Mollie. Therefor you should create a way to inform your app about the status update of the payment from your server. An option you have is to use a Silence Notification. See the guides for iOS and Android about how to integrate this in your app.
Example projects
While Mollie does not currently give support mobile integrations, we do have two sample projects that show how you can integrate payments through Mollie into your iOS and Android app.
Updated 6 months ago