Embedding a card form
Implement a PCI-DSS compliant card form in your checkout.
Overview
Mollie JS is a set of Javascript APIs that allow you to add the fields needed for credit card holder data to your own checkout, in a way that is fully PCI-DSS SAQ-A compliant.
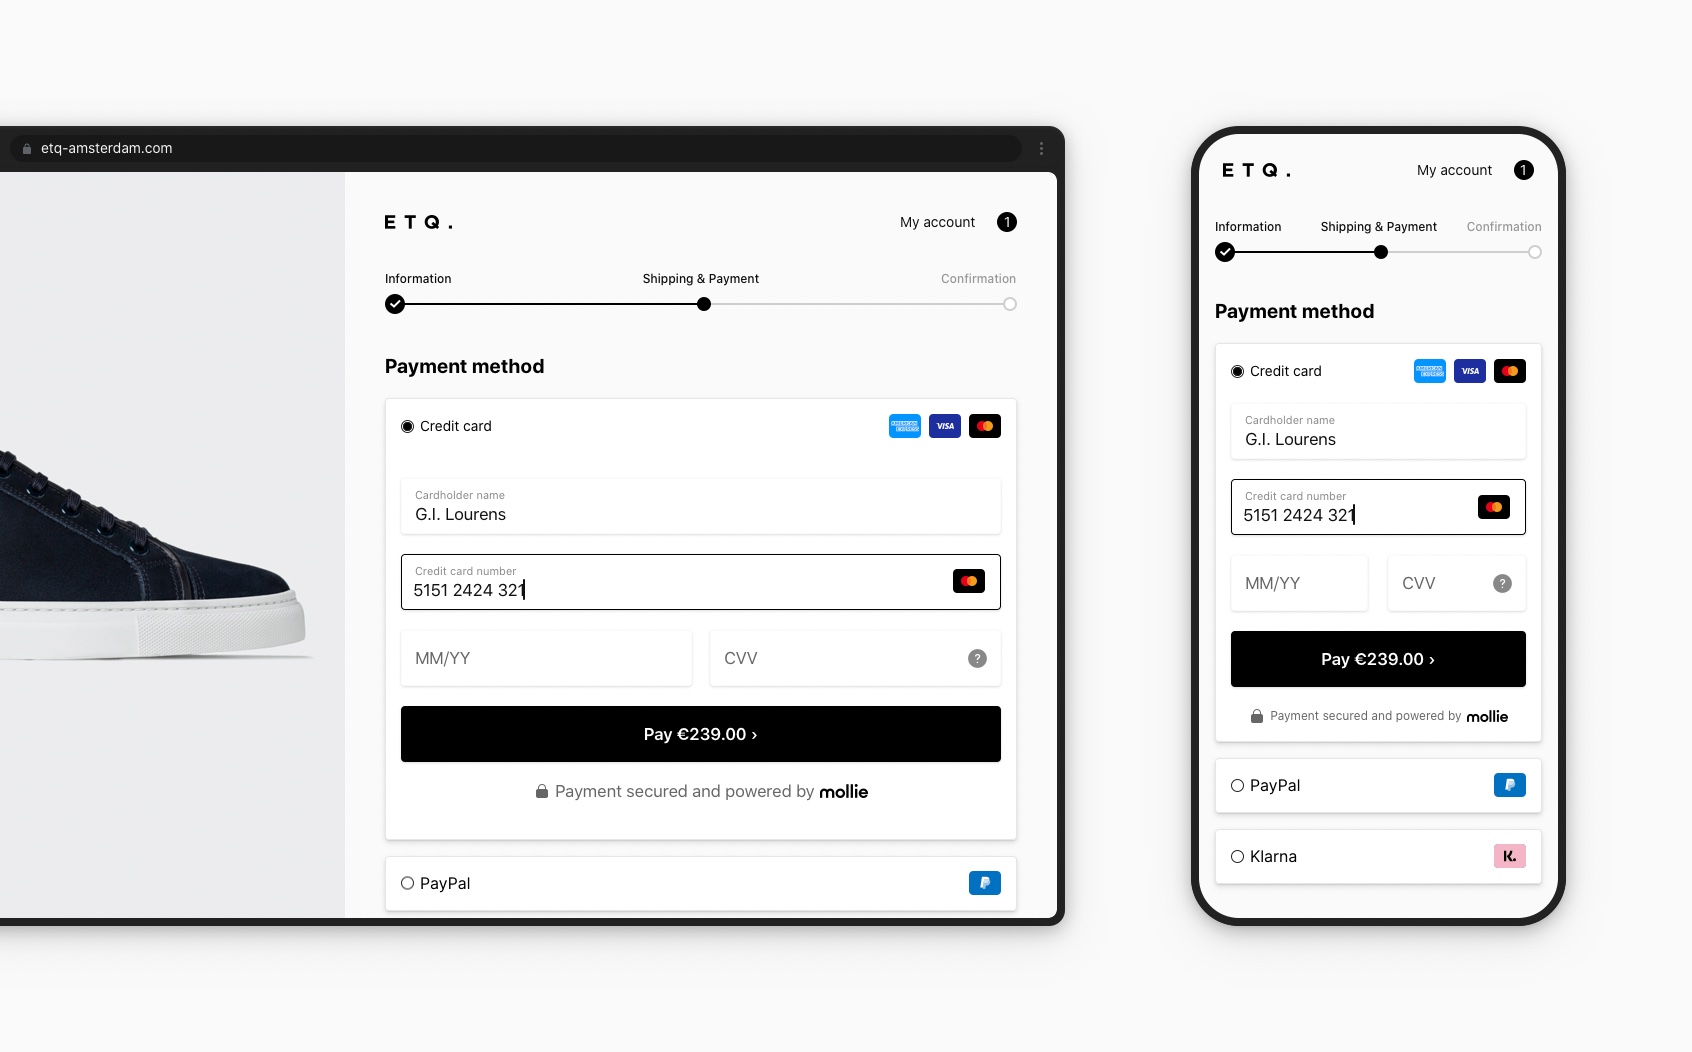
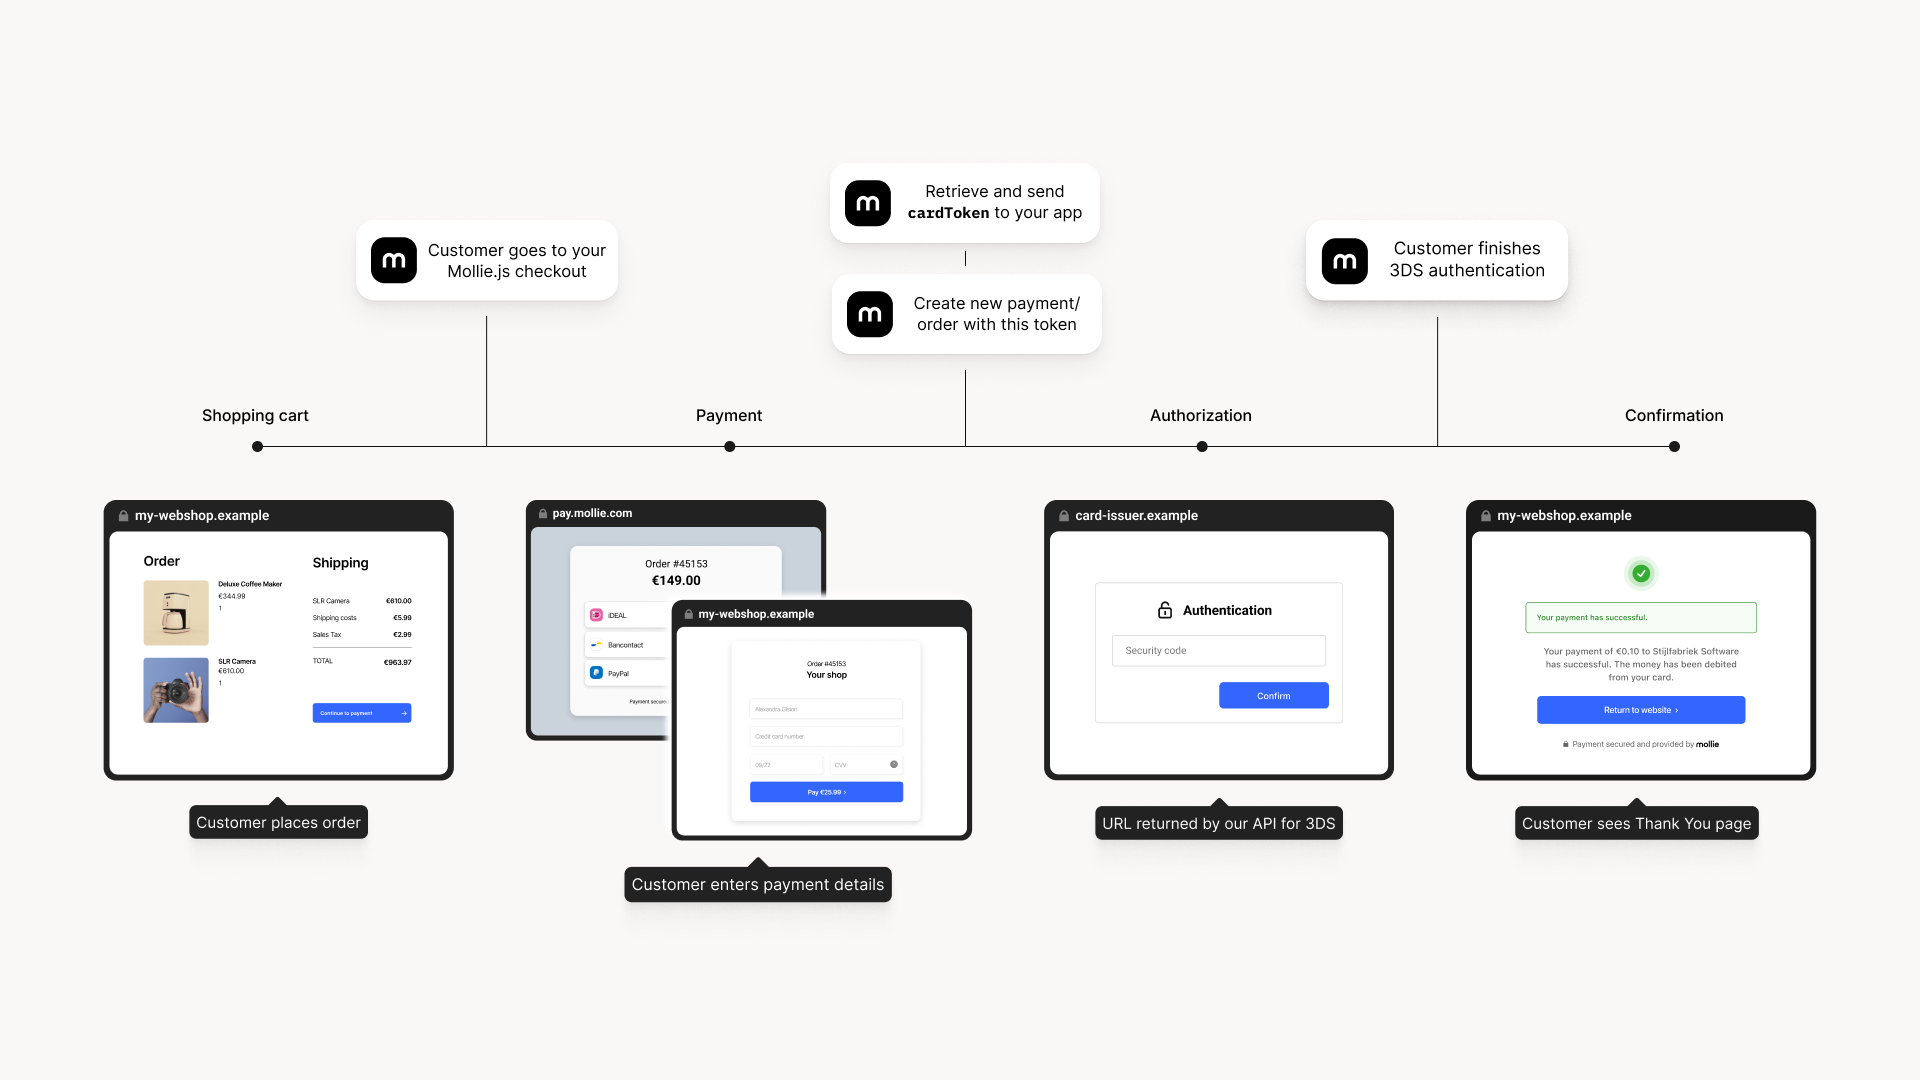
Mollie JS does not give you access to the card holder data. Instead, when the checkout is submitted, you use Mollie JS to exchange the card holder data for a cardToken which you can use with the Create payment endpoint.
Once you have created a payment, you should redirect your customer to the URL in the _links.checkout property from the response. This link is where your customer can perform the 3-D Secure authentication. If the customer authenticates successfully, the payment is completed.
Implementation steps
Follow these steps to add a card form in your checkout:
- Add Mollie.js to your checkout.
- Initialize the
Mollieobject. - Create and mount the the card form or separate input fields to your checkout.
- Add a
submitevent listener to your form to retrieve thecardTokenwhen your customer has completed the checkout form. - Send the
cardTokento your back end, by adding it to your form. - From your back end, create a credit card payment or order with the
cardTokenusing the Create payment endpoint. - Redirect the shopper to the URL returned by our API for 3-D Secure authentication.
Mollie has created example implementations you can use to get started.
Add Mollie.js to your checkout
Start by including Mollie.js into your project. It should be added just before the </body> tag.
The JavaScript file is located at https://js.mollie.com/v1/mollie.js.
<html>
   <head>
     <title>My Checkout</title>
   </head>
   <body>
     <script src="https://js.mollie.com/v1/mollie.js"></script>
   </body>
</html>If you are using Content Security Policy, you should whitelist the
js.mollie.comdomain (e.g.script-src js.mollie.comandframe-src js.mollie.com) and allow inline styles (e.g.style-src 'unsafe-inline'). We recommend using a strict CSP on your checkout.
Initialize the Mollie object
First, you need the ID of the profile that you want to use. This can be found on the Developers - API-keys page in the Web app or retrieved programmatically using the Get current profile endpoint.
After the script has loaded you can use the Mollie(profileId[, options]) function. This will return an object that you can use for creating the card form your customer will use to enter their card holder data.
var mollie = Mollie('pfl_3RkSN1zuPE', { locale: 'nl_NL', testmode: false });Be aware the profile ID is not your API key. Your API key is private and should never be used in a browser context. The profile ID starts with
pfl_,where as API keys start withlive_ortest_.
Create and mount the card form
After initialising the Mollie object, you can start to consume the shopper’s data. There are two ways to do this:
- Use the card form to implement our out-of-the-box solution.
- Use separate input fields to build your own card form that covers your specific use cases.
Option 1: Card form
The card form is a collection of all mandatory fields needed to accept a card payment. With this option, you can abstract your implementation from the DOM. This makes it easier to implement while covering most use cases. You can create the card form using the mollie.createComponent(type[, options]) and mount it in your checkout using the cardForm.mount(targetElement).
<form>
  <div id="card"></div>
</form>var cardForm = mollie.createComponent('card');
cardForm.mount('#card');Translated error messages will be rendered within the DOM automatically.
To customize the card form, see mollie.createComponent(type[, options]).
Option 2: Separate input fields
For more flexibility you can create and mount separate input fields out of which you can create your own card form. You can create them using the mollie.createComponent(type[, options]) and mount them in your checkout using the input.mount(targetElement). This will add the input fields to your checkout and make them visible to your customer.
<form>
  <div id="card-number"></div>
  <div id="card-number-error"></div>

  <div id="card-holder"></div>
  <div id="card-holder-error"></div>

  <div id="expiry-date"></div>
  <div id="expiry-date-error"></div>

  <div id="verification-code"></div>
  <div id="verification-code-error"></div>

  <button type="button">Pay</button>
</form>var cardNumber = mollie.createComponent('cardNumber');
cardNumber.mount('#card-number');
var cardHolder = mollie.createComponent('cardHolder');
cardHolder.mount('#card-holder');
var expiryDate = mollie.createComponent('expiryDate');
expiryDate.mount('#expiry-date');
var verificationCode = mollie.createComponent('verificationCode');
verificationCode.mount('#verification-code');To handle errors you have to add a change event listener to each element to listen for errors. Displaying the error is up to you. The example below assumes an empty element in which the error can be rendered.
Errors will be localized according to the locale defined when initializing the Mollie object.
var cardNumberError = document.querySelector('#card-number-error');

cardNumber.addEventListener('change', event => {
  if (event.error && event.touched) {
    cardNumberError.textContent = event.error;
  } else {
    cardNumberError.textContent = '';
  }
});
Add a submit event listener to your form
Add a submit event listener to your form and use the mollie.createToken() function to get the token. You can then place the cardToken in a hidden input to submit it to your back end, for example:
form.addEventListener('submit', async e => {
  e.preventDefault();

  var { token, error } = await mollie.createToken();

  if (error) {
    // Something wrong happened while creating the token. Handle this situation gracefully.
    return;
  }

  // Add token to the form
  var tokenInput = document.createElement('input');
  tokenInput.setAttribute('type', 'hidden');
  tokenInput.setAttribute('name', 'cardToken');
  tokenInput.setAttribute('value', token);

  form.appendChild(tokenInput);

  // Submit form to the server
  form.submit();
});
Create a payment with the card token
On your back end, you will receive the cardToken. You need to pass this when creating a payment. Additionally, you should set the method to creditcard. The cardToken is valid for 1 hour.
Example
curl -X POST https://api.mollie.com/v2/payments \
   -H "Authorization: Bearer live_dHar4XY7LxsDOtmnkVtjNVWXLSlXsM" \
   -d "method=creditcard" \
   -d "amount[currency]=EUR" \
   -d "amount[value]=10.00" \
   -d "description=Order #12345" \
   -d "redirectUrl=https://webshop.example.org/order/12345/" \
   -d "webhookUrl=https://webshop.example.org/payments/webhook/" \
   -d "cardToken=tkn_UqAvArS3gw"
<?php
$mollie = new \Mollie\Api\MollieApiClient();
$mollie->setApiKey("live_dHar4XY7LxsDOtmnkVtjNVWXLSlXsM");
$payment = $mollie->payments->create([
"method" => "creditcard",
"amount" => [
"currency" => "EUR",
"value" => "10.00"
],
"description" => "Order #12345",
"redirectUrl" => "https://webshop.example.org/order/12345/",
"webhookUrl" => "https://webshop.example.org/payments/webhook/",
"cardToken" => "tkn_UqAvArS3gw",
]);from mollie.api.client import Client
mollie_client = Client()
mollie_client.set_api_key('live_dHar4XY7LxsDOtmnkVtjNVWXLSlXsM')
payment = mollie_client.payments.create({
'method': 'creditcard',
'amount': {
'currency': 'EUR',
'value': '10.00'
},
'description': 'Order #12345',
'redirectUrl': 'https://webshop.example.org/order/12345/',
'webhookUrl': 'https://webshop.example.org/payments/webhook/',
'cardToken': 'tkn_UqAvArS3gw'
})require 'mollie-api-ruby'
Mollie::Client.configure do |config|
config.api_key = 'live_dHar4XY7LxsDOtmnkVtjNVWXLSlXsM'
end
payment = Mollie::Payment.create(
method: 'creditcard',
amount: {
currency: 'EUR',
value: '10.00'
},
description: 'Order #12345',
redirect_url: 'https://webshop.example.org/order/12345/',
webhook_url: 'https://webshop.example.org/payments/webhook/',
card_token: 'tkn_UqAvArS3gw'
)const { createMollieClient } = require('@mollie/api-client');
const mollieClient = createMollieClient({ apiKey: 'live_dHar4XY7LxsDOtmnkVtjNVWXLSlXsM' });
const payment = await mollieClient.payments.create({
method: 'creditcard',
amount: {
currency: 'EUR',
value: '10.00'
},
description: 'Order #12345',
redirectUrl: 'https://webshop.example.org/order/12345/',
webhookUrl: 'https://webshop.example.org/payments/webhook/',
cardToken: 'tkn_UqAvArS3gw'
});Make sure you use the API key that belongs to the same profile you used when initializing the Mollie object.
Redirect the shopper to the 3-D Secure authentication page
You should redirect your customer to the _links.checkout URL returned by the Create payment endpoint. Your customer can then authenticate themselves with the card issuer.
Styling
The card form can be fully styled to ensure a smooth blend-in with your checkout. Most of the styling should be applied to the injected .mollie-component container. The <div className="mollie-component"></div> container lives completely in your own environment and thus will give the most flexible way of styling. To see how this works, visit our Components Examples repository for examples.
| Class name | Description |
|---|---|
.mollie-component | Will always be present. You can use this class to style border and background properties. |
.mollie-component--<input name> | The element will be identified on by the name itself. This can be used to target one specific input element. |
.mollie-component--is-loading | Indicates that the component is still loading. It will disappear after the component is loaded. |
We also set some dynamic classes to reflect the state of the component as the user interacts with it.
| Class name | Description |
|---|---|
.is-touched | This class is set when the input receives focus for the first time. You may use this class in combination with another class to style error states.. |
.is-touched | This class is set when the input receives focus for the first time. You may use this class in combination with another class to style error states. |
.is-valid | This class is set when the input contents are valid. You may use this class to give feedback to the user before submitting the form. |
.is-invalid | This class is set when the input has received focus and removed when the element has lost focus. You may use this class to outline the field so the user knows the input is interactive. |
Styling text-related properties
Text styling properties related properties in the input field itself can't be styled from outside the iframe because iframes will block CSS inheritance. These properties can be applied when creating input elements. You can target different states of the input when applying them:
| State | Description |
|---|---|
base | The state of the input when your customer has not entered any data yet or is entering data. These styles will also become the default styles for the valid and invalid states. |
valid | The state of the input when your customer has entered valid data, such as a valid credit card number. |
invalid | The state of the input when your customer entered invalid data, such as an expiry date in the past. |
For each of these there is an set of properties you can use:
backgroundColorof typecolorcolorof typecolorfontSizeof typenumberfontWeightof typestring|numberletterSpacingof typenumberlineHeightof typenumbertextAlignof typestringtextDecorationof typestringtextTransformof typestring
Every property has one or more types. Multiple types are indicated by a | character. We do not allow URL, http, https, and www.
stringA valid string, spaces aren't allowed,numberA valid CSS number with an optional unitpx,emorrem.colorWe accept colors as#f00,#ff0000,rgb(a),hsl(a)andtransparent,
We allow the following pseudo-classes. These will be autoprefixed and can be nested with the above listed properties.
::placeholder
Example
var options = {
   styles : {
     base: {
       color: '#eee',
       fontSize: '10px',
       '::placeholder' : {
         color: 'rgba(68, 68, 68, 0.2)',
       }
     },
     valid: {
       color: '#090',
     }
   }
 };

 var cardNumberEl = mollie.createComponent('cardNumber', options)
Handling errors
When paying with a credit card, several errors can occur during the payment process that are outside of your or Mollie’s control. For example, the consumer has entered an incorrect CVV, has insufficient balance on their card or the issuing bank could decline the transaction. Should an error occur, you should make the consumer aware of the error so they can correct the problem and continue the checkout.
How can I find out what error occurred?
If creating the payment was unsuccessful, the API response will contain an error in the format shown here. If creating the payment was successful, Mollie will give you the _links.checkout URL where the consumer will have to authenticate themselves with their card issuer through 3-D Secure authentication.
In the case that an error occurs during or after authentication, the payment status will be failed and final. If you want to let the consumer attempt to pay again, you should collect a new card token and create a new payment using our API. The reason of the error will be present in the details object of the Get payment endpoint response, as shown below:
details string
details stringAn object with credit card-specific details on the payment. Note that there are various other fields which have been omitted here for the sake of brevity.
Child parameters:
failureReason string
failureReason stringOnly available for failed payments. Contains a failure reason code.
Possible values:
authentication_abandonedauthentication_failedauthentication_requiredauthentication_unavailable_acscard_declinedcard_expiredinactive_cardinsufficient_fundsinvalid_cvv invalid_card_holder_nameinvalid_card_numberinvalid_card_typepossible_fraudrefused_by_issuerunknown_reason
failureMessage string
failureMessage stringA localized message that can be shown to the consumer, depending on the
failureReason.
Example value:Der Kontostand Ihrer Kreditkarte ist unzureichend. Bitte verwenden Sie eine andere Karte.
This is provided as a convenience, you can of course also use your own messages.
Testing
You can use regular test mode to test card payments using Mollie JS.
First, you will have to initialize the Mollie(profileId[, options]) constructor with your profile ID and the testmode option:
var mollie = Mollie('pfl_3RkSN1zuPE', { locale: 'nl_NL', testmode: true });When test mode is enabled, the card tokens you receive should be used in combination with your Test API key instead of your Live API key. Therefore, make sure you use the correct API key when creating the payment.
Test card numbers
You can use test card numbers provided by the different card issuers to test different types of cards. Refer to our testing guide for a list of test card numbers.
Testing failure scenarios
Card payments can fail for various reasons ranging from having provided an invalid card number to having the card issuer reject the payment due to insufficient funds. In the case of a failed credit card payment, the API therefore includes a failureReason in the payment response to provide more context.
To test the various card payment failure reasons the Mollie API can return, refer to our testing guide.
Browser support
Mollie JS supports the current and previous major release of the following browsers:
- Chrome
- Chrome for Android
- Safari
- Safari iOS
- Opera
- Firefox
- Edge
- The latest release of Microsoft Internet Explorer 11 is supported as well.
Updated 2 months ago